SHARE
What is a CSV File? The Ultimate Guide in 2026

Contents
Contents
Introduction
A CSV (Comma-Separated Values) file is a file format used to store and exchange tabular data in a plain text format. CSV files are widely used in various applications, including data storage, data exchange, and data analysis. CSV files are widely used for data storage and exchange needs since many software applications allow for exporting or importing data in CSV format.
What is a CSV File?
CSV files are a form of simple data storage. A CSV file is a simple text file that stores tabular data in a structured format. In a CSV file, each line represents a single record, and each record consists of one or more fields separated by a delimiter, typically a comma. The first line of the file often contains the headers that describe the contents of each column.
CSV files are a popular choice for storing and exchanging data because they are simple and easy to use. They can be created and edited with any text editor and can be imported and exported by many software applications. CSV files can be easily imported into spreadsheet applications like Microsoft Excel or Google Sheets, making it easy to manipulate and analyze large sets of data.
What is a CSV File Used for?
Here are some of the most common uses of CSV files:
- Data storage: A CSV file is popular for storing data because it is lightweight, easy to use, and easily edited with a text editor. For example, a business might use a CSV file to store customer data, product data, or inventory data in a format that is easily accessible and shareable.
- Data exchange: CSV files are often used to exchange data between different applications and systems, especially when the data needs to be imported or exported from one system to another. For example, a company might use a CSV file to transfer data from an e-commerce platform to a customer relationship management (CRM) system.
- Data analysis: CSV files are commonly used because they can be easily imported into various software tools and platforms, such as Microsoft Excel or Google Sheets. This makes it easy to analyze and manipulate large data sets, such as sales, surveys, or financial data.
- Website content management: CSV files can be used to manage website content, such as product descriptions, prices, and images. For example, an e-commerce website might use a CSV file to upload product information to its website.
- Database management: A CSV file can also be used as a simple database management tool for small data sets. This is because CSV files can be easily imported and exported from database management systems like MySQL, making it easy to manipulate and manage data.
History of the CSV Format
The CSV format has been around longer than the personal computer. It was first used by the IBM Fortran compiler in 1972 and further defined over time. Free-form list-directed input-output was defined in 1978 by Fortran 77. The terms comma-separated value and CSVs were used by 1983 when Osborn Computing Company (OCC) and its SuperCalc spreadsheet defined the quoting convention allowing strings to contain embedded commas. Since then, there have been few attempts to standardize the format. It was not until 2005 that serious attempts to standardize the well-known but poorly documented format with the RFC 4180 initiative. It has gone under numerous revisions since, but because of how long it went without regulation, there are still a lot of different versions out there.
The Structure of a CSV File
A CSV file can be a plain text file and leverages a simple structure that is not only easy for computers to understand but is also human-readable.
The structure of a typical CSV file encompasses three primary components:
| CSV File Component | Purpose |
|---|---|
| Header Row | The first line, serving as the column titles, indicating the type of data each column holds. It uses the same format as subsequent data rows, with values separated by a delimiter. |
| Delimiter | A character that separates the values in each row. While the comma is the standard delimiter in CSV files (hence the name), other delimiters like tabs (in TSV files) can also be used, depending on the file format and requirements. |
| Data Rows | Following the header, each row represents a new data entry, with values organized according to the header titles and separated by the chosen delimiter. In spreadsheet software, these rows correspond to individual rows in the grid, presenting the data in an organized, tabular form. |
By adhering to this structure, CSV files provide a straightforward means of storing and exchanging tabular data, facilitating easy import and export across different software and platforms.
An Example CSV File
The following displays an example of a simple CSV file, as you would see it in a text editor. The first row is the header row, displaying the type of information that should be placed in the lines to follow, as well as the order in which they are presented. Each column is separated by a comma, as are the rows that follow.
How to Open a CSV File
Opening a .CSV file is usually automated, provided that your PC recognizes the format. The CSV file will simply open in the program you typically open it with. If it does not, you must tell your computer which program to use to open a CSV file. If you need to open the CSV file with a different program than usual, you will have to repeat the process and select the correct program from the available options.
How to View a CSV File in a Text Editor on Windows
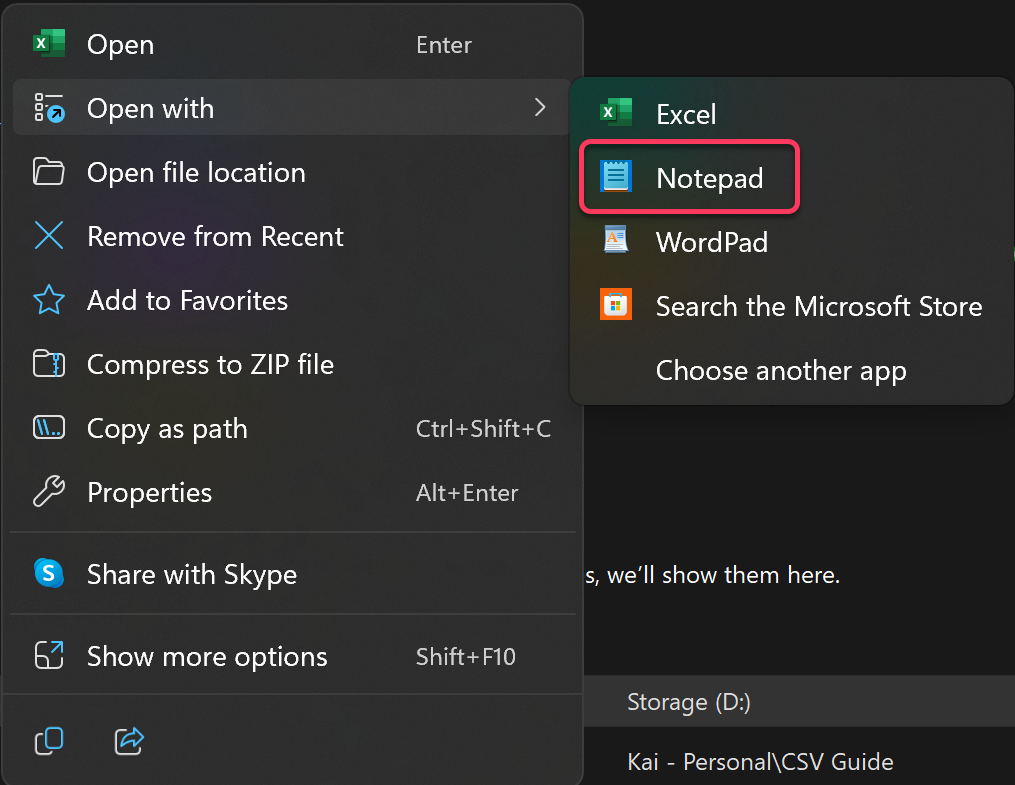
By default, a CSV file will open in Excel. Instead, open it in a text editor, right-click the file, and select the Notepad option from under Open with if available.
If Notepad is not shown as an option under Open with, simply select Choose another app.
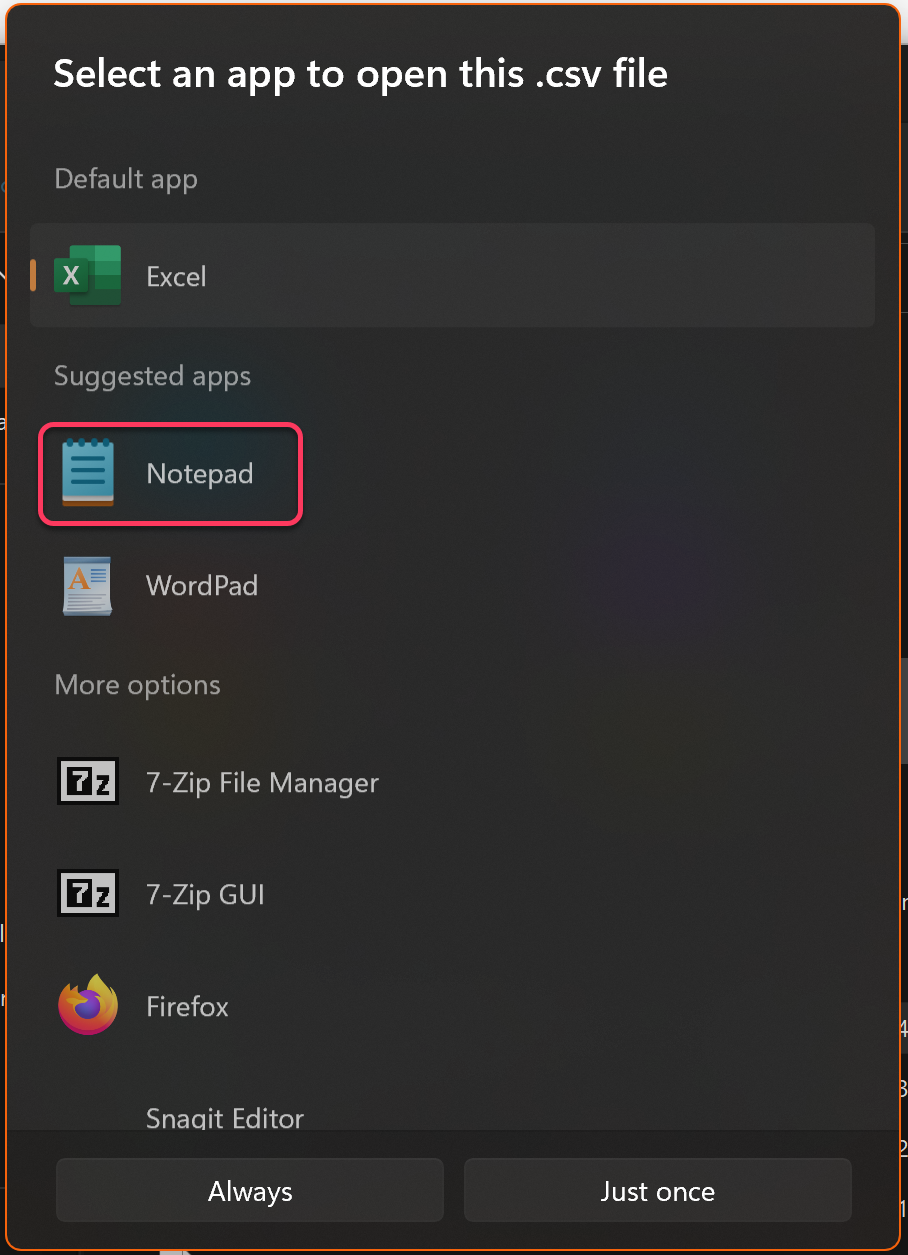
Notepad should be available under suggested apps.
How to View a CSV File in a Text Editor on Mac
To open a CSV file in TextEdit, the default text editor included in MacOS is pretty simple.
- Open TextEdit on your Mac and select File > Open… from the menu bar at the top of your screen or press Command+O on your keyboard to open a dialog box where you can navigate to the file you want to open.
- Navigate to the folder containing your CSV file and select it from the list of files shown in the dialog box.
- Make sure that “Plain text encoding” is selected from the dropdown menu at the bottom of this dialog box before clicking Open.
How to Open a CSV File in Excel
Excel handles CSV files exceptionally well, and you should have no difficulty importing a CSV file. Indeed, once you have done it once, you should be able to open subsequent files simply by clicking to open. Excel becomes your default CSV Importer.
Assuming you have not yet received a CSV file to use in Excel – or that you are doing it for the first time on a new PC and a fresh install of Excel. In most cases, this will still be a simple process, and may even automatically open the file anyway. But what if for some reason it doesn’t recognize the format as anything but another text file? What if through user error, another program has been set as a default for CSV files? Let’s go through the permutations, shall we?
To save a text file as a .CSV file, click Save as in Notepad (or whatever text editor you use). In the dropdown labeled Save as Type, select “All Files”. Type the name of the file, and add the extension as .csv, for example ‘Test File.csv’.
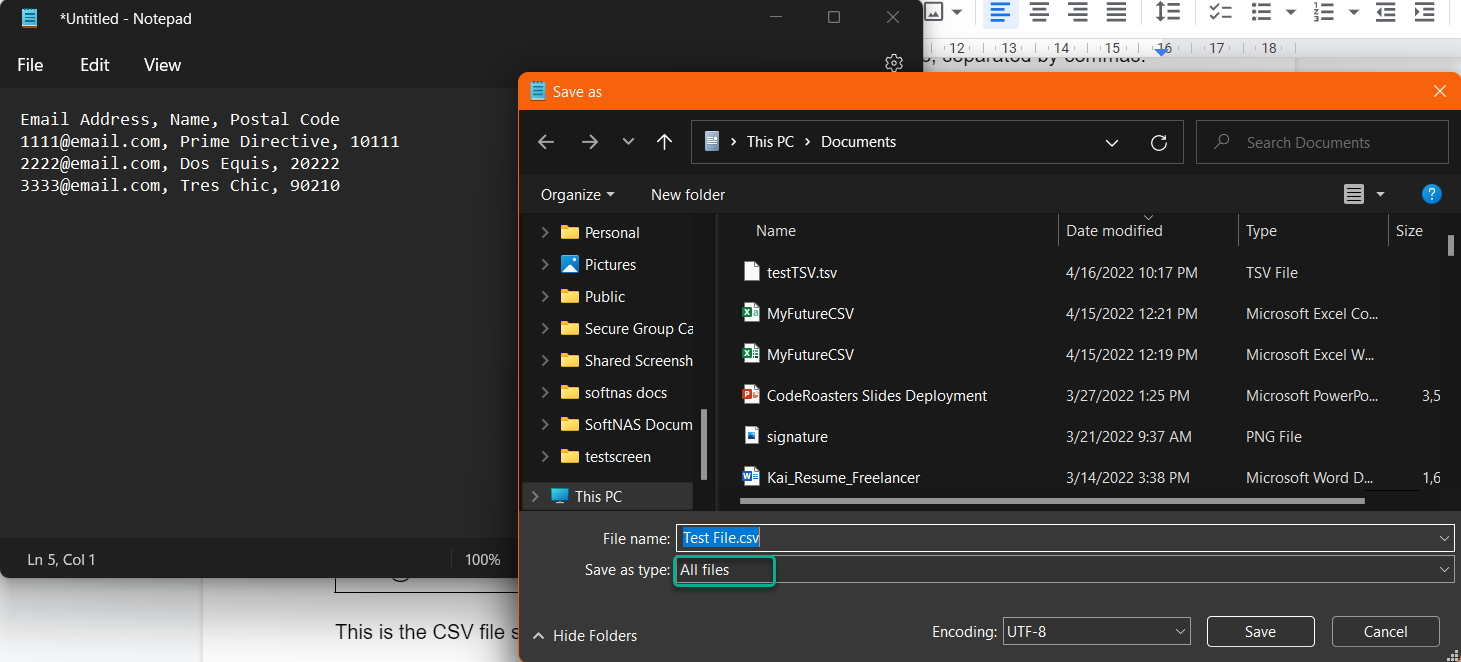
Once your text file is saved as a CSV file, you can verify the file was saved correctly by going to file properties. First, find the file, wherever it may reside. Chances are if it was recently received, it will be in your Downloads folder, or you can find it under ‘Recent files’ under Quick Access. We’ll use the latter option in this example.
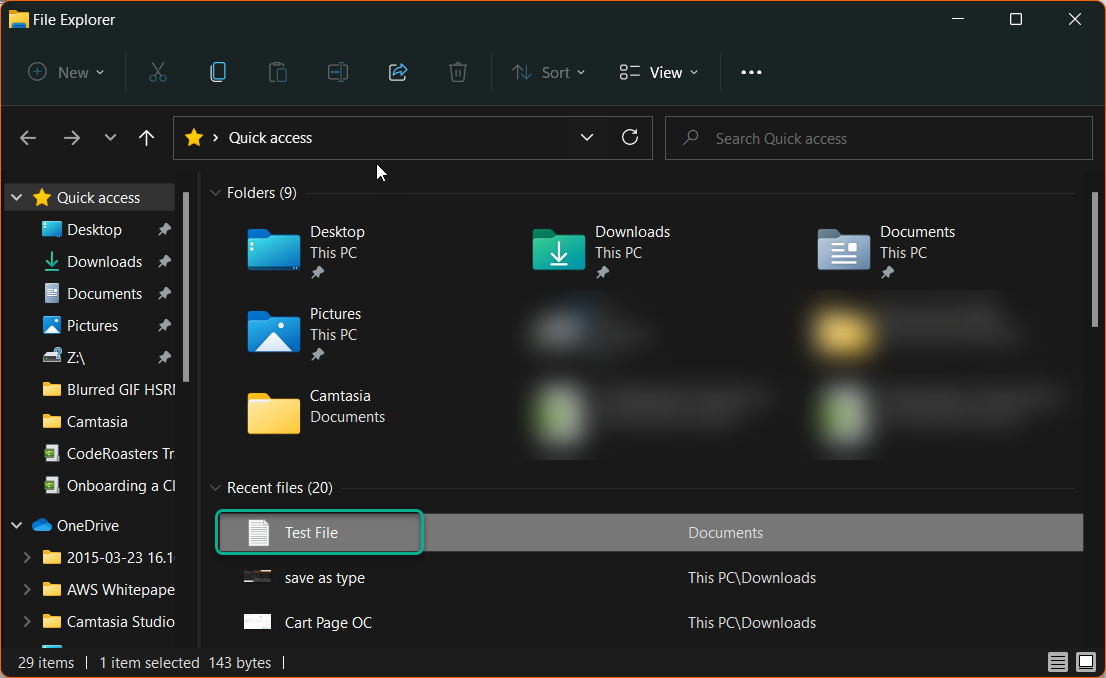
Right-click the file and select Open with. You will note that Excel is an option here, this may not be the case if this is your first time opening a CSV, or if you have accidentally previously selected another program as the default for CSV. Click Excel if it is present. If Excel is not an option, then select Choose another app.
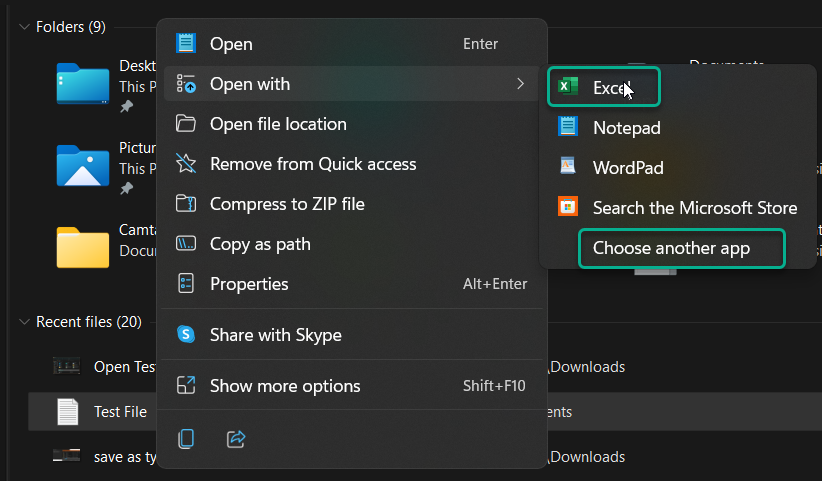
If Excel is provided as an option, and you select it here, the process is complete.
If Excel is not available as an option
In Choose another App, if Excel is not shown as one of the default options, select More Apps.
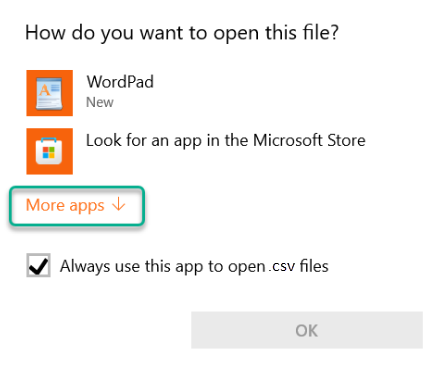
In More Apps, search for Excel. For the purposes of this blog, we will assume it’s on your PC, but if not, you can look for it in the Microsoft Store. Again, if you do not see Excel listed, you will need to select “Look for another app on this PC”.
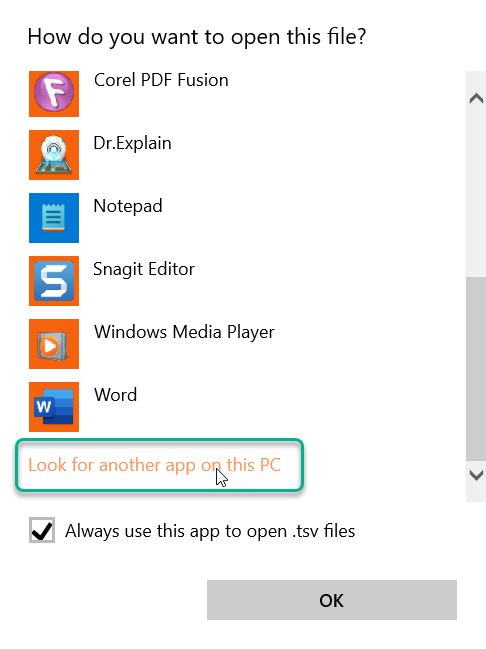
This will open a file search window that defaults to C:\Program Files on your PC. You will need to find the Excel application. By default, this will be found in C:\Program Files\Microsoft Office\root\Office16. Scroll down the list until you see the Excel icon and select it. Click Open.
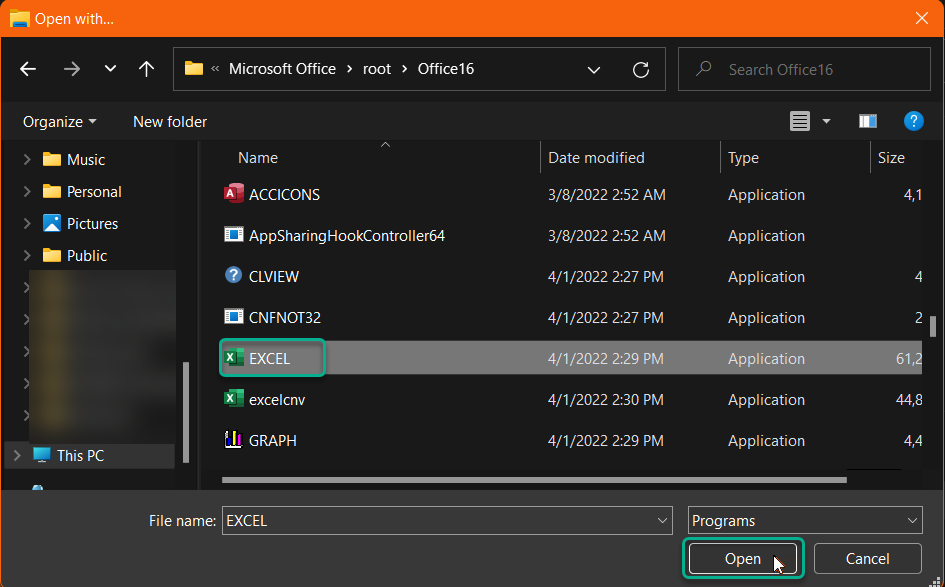
Upon clicking Open, two things will happen:
- Excel will open with the CSV info presented.
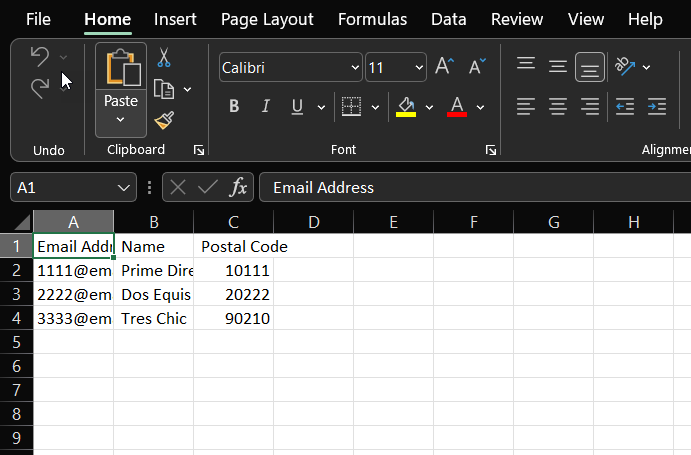
- Excel will become the default option for opening (importing) CSV files.
You may want to perform some formatting within Excel to differentiate the headers, enlarge the columns, or wrap text to make the CSV content easier to work with. But essentially, you are now good to go and can import as many .CSV files as you want to Excel. In Excel, you can format the CSV file to meet the import requirements of a target system. To ensure it complies with the target system requirements, Flatiron Fuse can help you out. Once edited, export the file as CSV from Excel.
How to Open a CSV File in Google Sheets
To open a CSV file in Google Sheets, open Google Sheets, and open a blank sheet. In the blank sheet, click File, and Open.
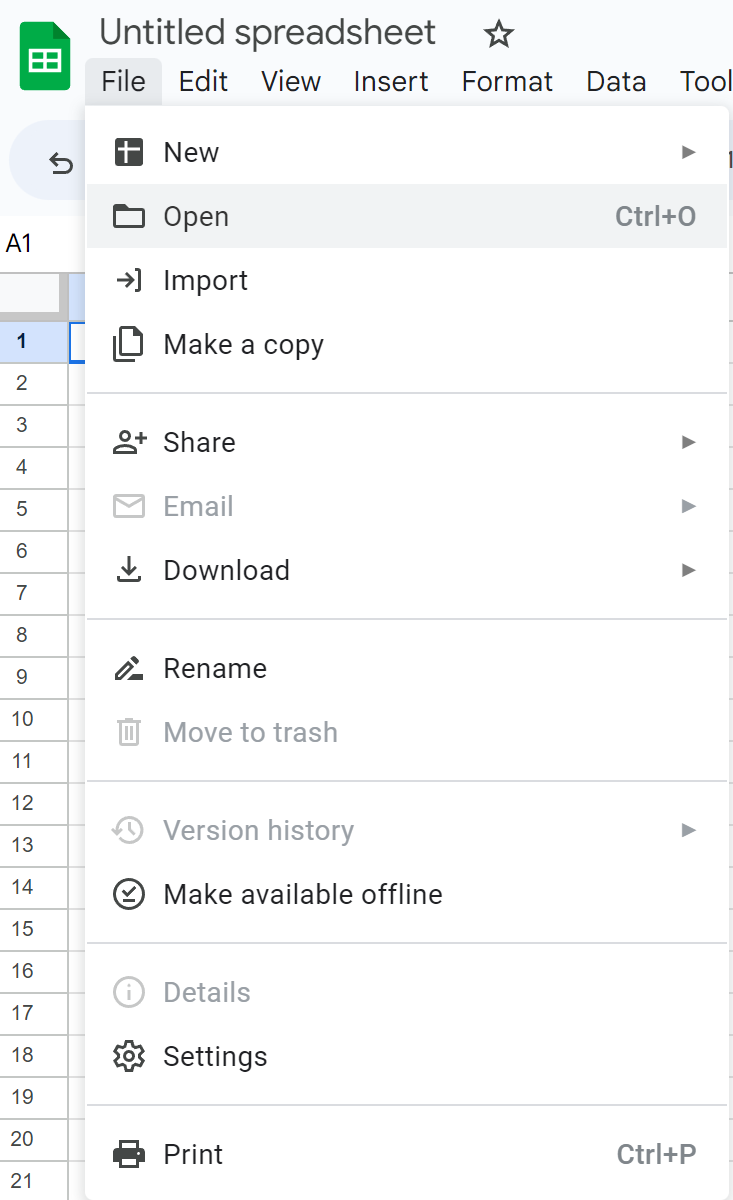
If, as in our case, the file is on your PC, click the Upload option, then click Browse. Select the desired file from your PC. Alternatively, drag the file to the box to be uploaded.
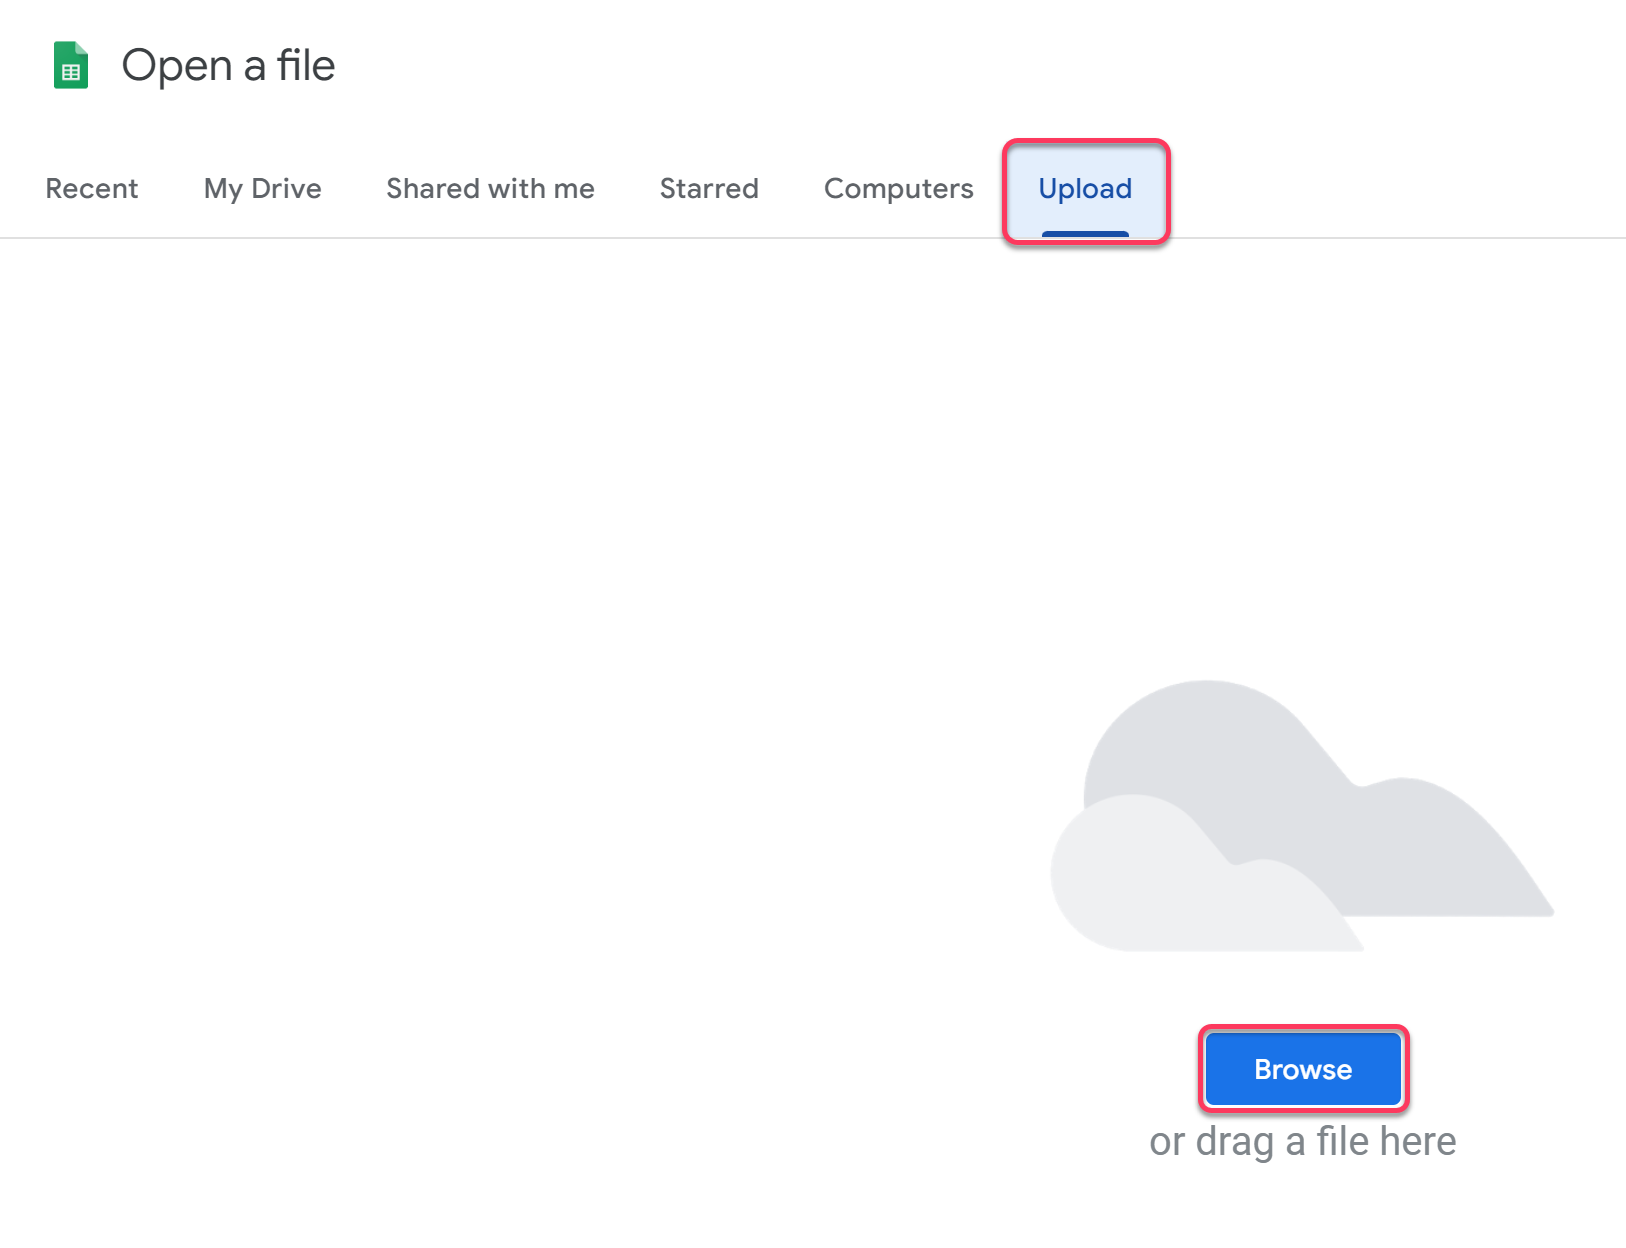
Select the file and click Open. Google Sheets will recognize the CSV format and open the file automatically.

How to Create a CSV File
As stated, the CSV format is ridiculously easy to learn and use in its most simple format. In its most straightforward format, it is written simply as lines of entries, separated by commas. A top-line establishes headers, and each subsequent line matches records and fields to the top header line.
For example, the below lines of text, if saved as a .csv file, would be read in your spreadsheet as:
This is the CSV file structure in its most basic form. Pretty simple, right?
Nearly every spreadsheet program out there has multiple options to export via CSV. Analytics software (such as IBM Cognos, for example) allows data to be exported as CSV because it is readily usable for import purposes on other systems. JSON and other languages are common, but CSV is almost always an option for more straightforward tabular datasets.
When exporting CSV files, we recommend always using the latest CSV version (UTF-8) as it is the most commonly used format. This is very important if using an exported file to import elsewhere. The transferability of CSV is the key reason for its popularity, and standardizing on the latest format and version is one way to limit potential problems in moving your data.
How to Save a Text File as CSV
Saving a text file as CSV is a very simple operation. First, of course, you have to be sure the text within is formatted correctly as CSV, as shown in previous examples. Once you have the desired CSV content defined, click Save as.
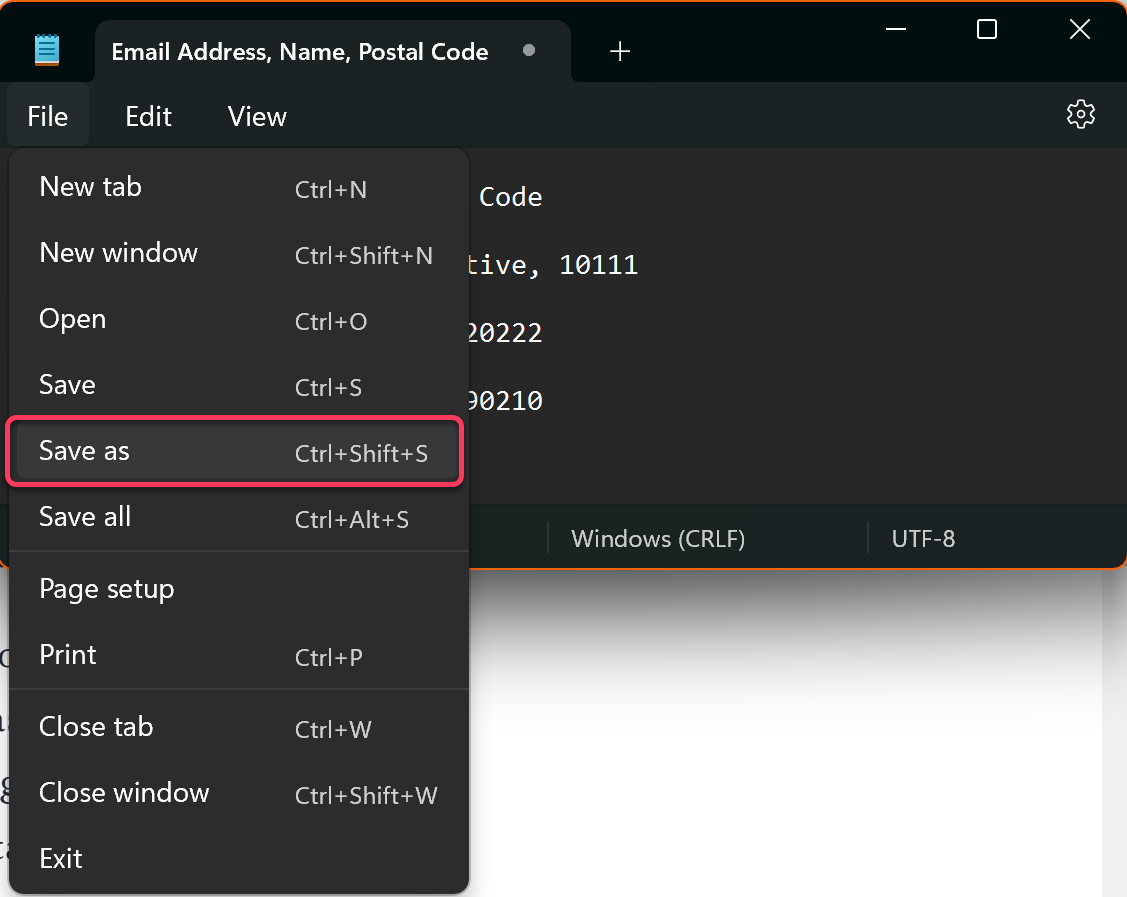
Change the file type from Text documents (*.txt) to All Files. All that remains is to add .csv as a file extension to the name of the file.

Click Save.
How to Export a CSV File from Excel
Excel handles CSV files natively and can read both file types without difficulty. In some cases, you might not even realize you are working with a CSV. Here you can see two different files I created, one with a .csv extension, and one with .xlsx (excel). Can you tell the difference?
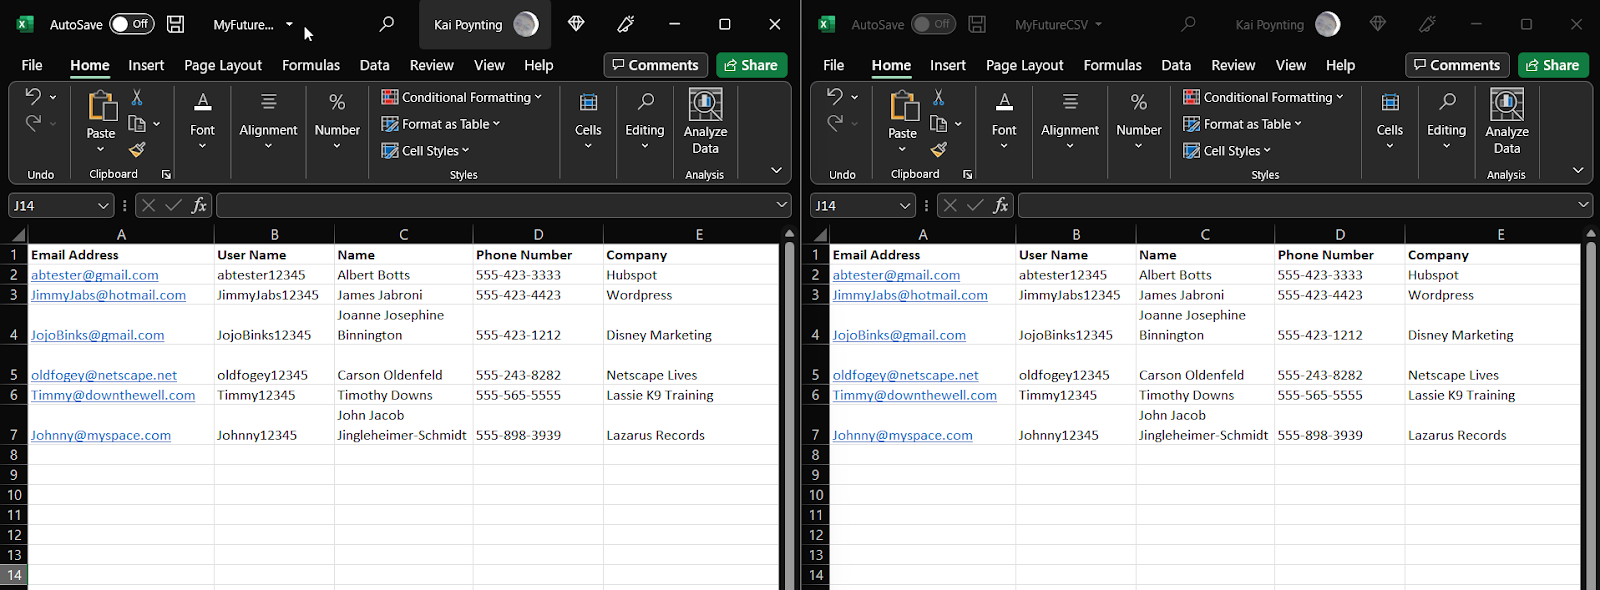
So, first things first, which format are you working with? Did your colleague send you an Excel sheet or a CSV? A common user error is to think you can simply rename the file and change the extension to make an Excel sheet into a CSV file. It is always a good idea to check the properties of the file just to make sure.
Check the properties
To check the properties is a simple task. First, find the file, wherever it may reside. Chances are if it was recently received, it will be in your Downloads folder, or you can find it in your recent files under Quick Access. We’ll use the latter option in this example.
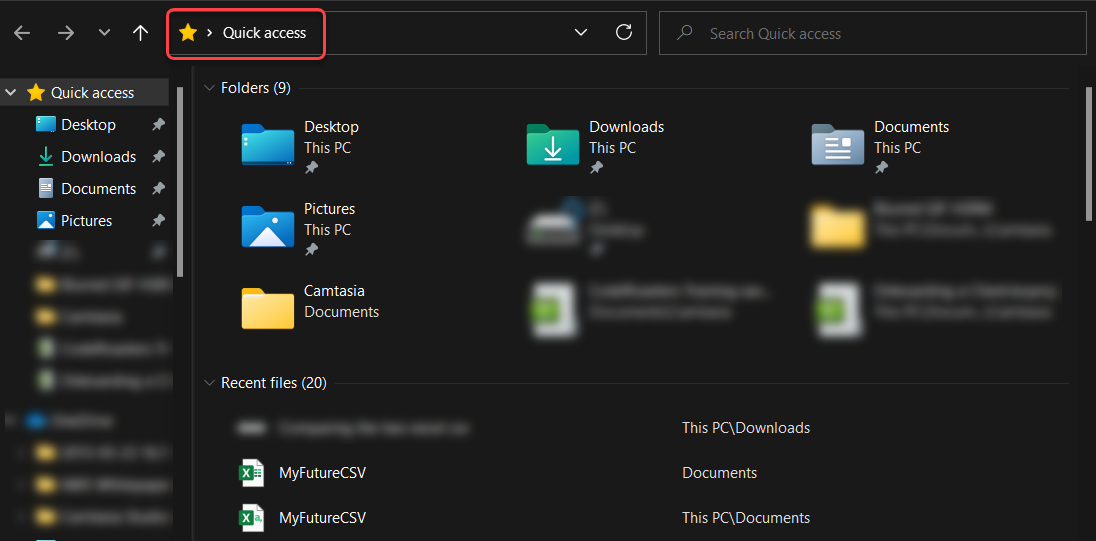
Note that the two files I created (both labeled MyFutureCSV) are present in the recent files section. But which is which? To determine this, right-click the file, and go to Properties.
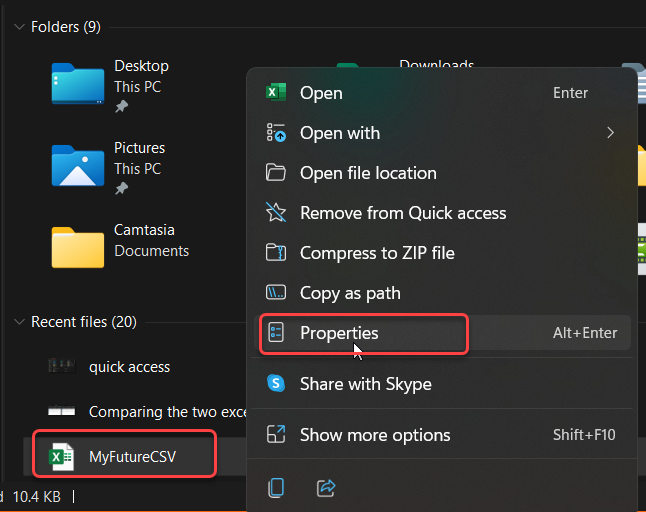
In the file properties, you will see ‘Type of File’. Here you will see whether the file is an Excel Worksheet file (.xlsx) or a ready-to-export CSV file. In this example, we see it is an Excel file.
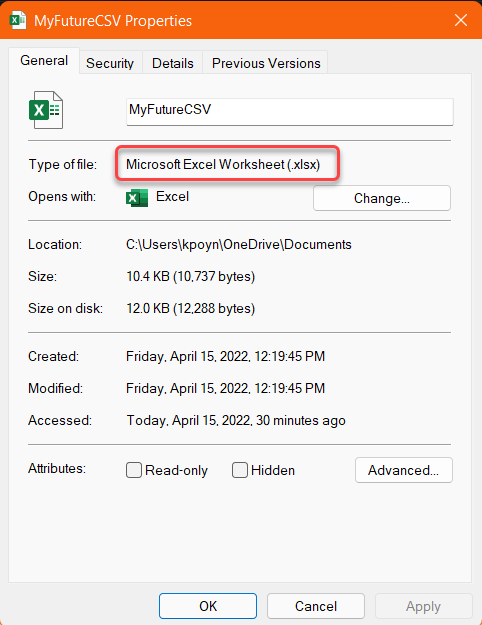
Note: In the file properties, be careful – you might see the Excel logo beside ‘Opens with’ and at a glance assume it is an Excel file. In this case, it is, but .CSV files will also show this logo, as both will open with Excel.
Converting the Excel Worksheet to CSV File
Now that we know that we are indeed working with an Excel Worksheet, it’s time to convert our file to an import-ready CSV file. Again, this is a simple task to complete.
First, rather than simply clicking the disk icon to save the document, go under File, and select Save As.
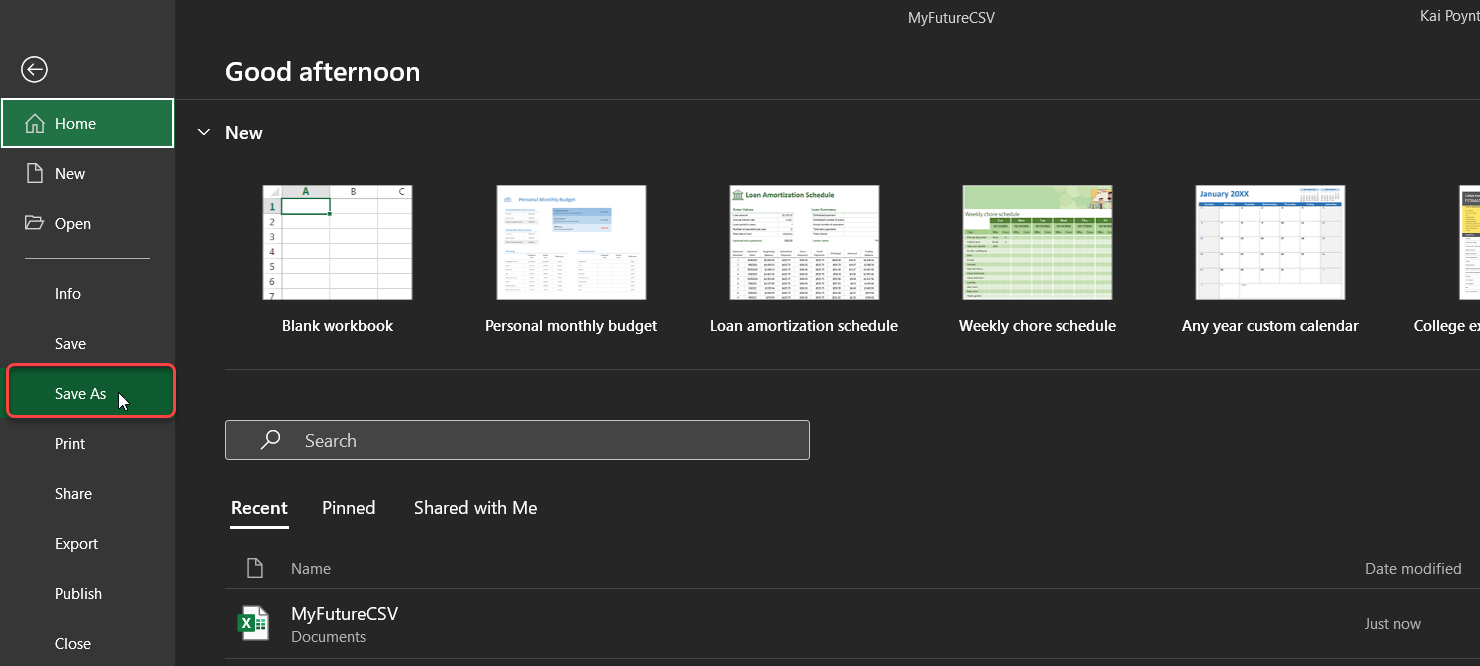
In the dropdown in which the file type is shown (it will default to the current file type), select CSV from the drop-down. Most modern systems will use the first CSV option, CSV UTF-8. However, if importing to an older service or system, verify the correct CSV version for their solution, just to be safe.
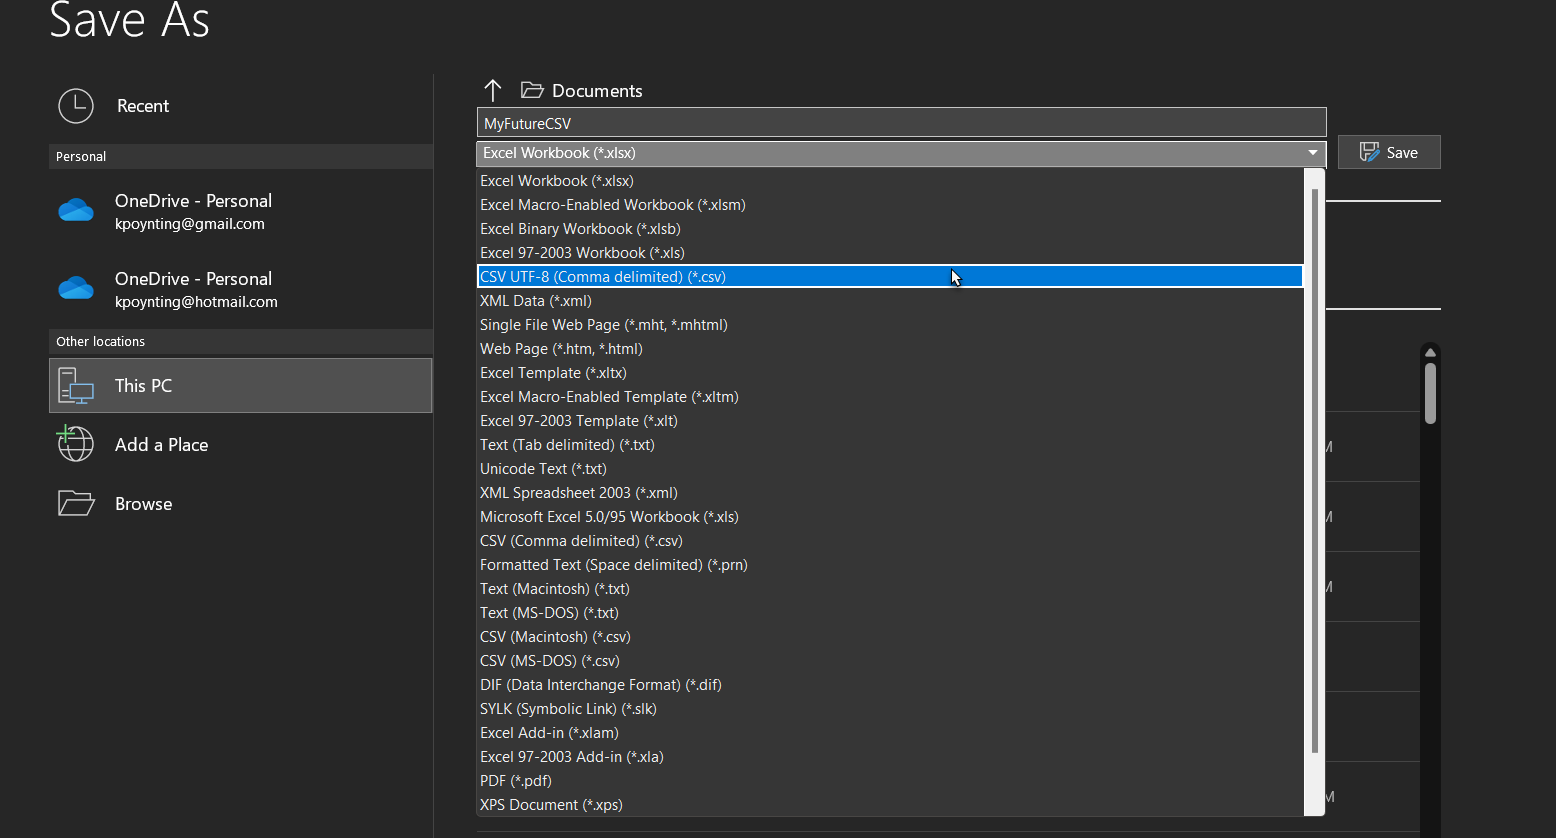
Be aware that a CSV file can only be a single sheet and will not convert properly unless multiple sheets are first separated.
That’s all there is to it. Remember, changing the name of the file to include a CSV extension does not actually change the file format. Be sure to check the file format before uploading to the service to ensure it is properly formatted and ready to go. Good luck importing your next CSV file!
How to Export a CSV File from Google Sheets
Exporting a CSV file from Google Sheets is even simpler than the Save as operation outlined above. Once the Google Sheets file is created with the desired values, simply click File, and scroll down to Download. Select Comma Separated Values (.csv).
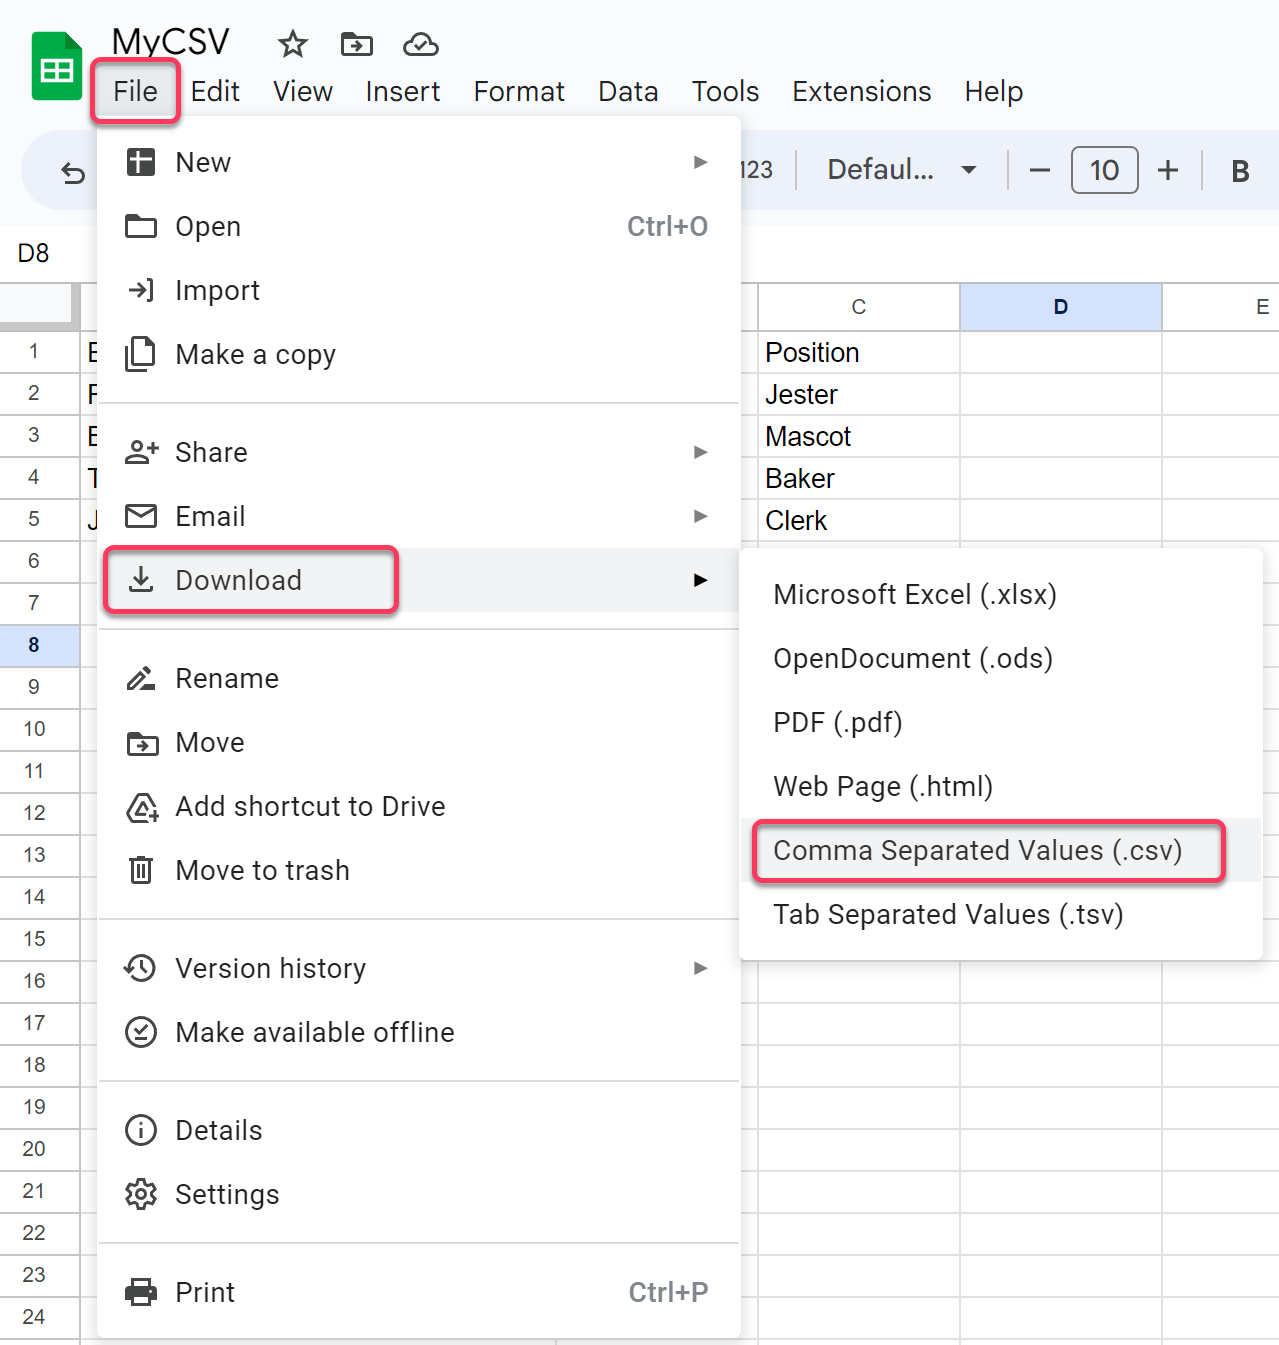
The file will be downloaded to your local device as a CSV file. That’s all there is to it.
Converting to and from CSV
Converting from CSV to JSON
CSV is the go-to file format for transferring files, importing to target systems, or exporting from Excel or proprietary systems, especially for simple tabular data, it is by far not the only format used. While we at Flatirons Fuse are focused on CSV imports, JSON is one of the most common of these alternate formats, and we would be remiss in not providing you with some means of dealing with applications using this format. The good news is that there are free online tools available that can make the transformation quick and painless.
But first, we need to cover some basics. One of the most important things to remember is that there need to be well-defined headers in the CSV file for a conversion to be successful. Without a header row, JSON won’t know what to do with the data to categorize each column.
Retool
The first method to convert CSV to JSON is a free utility provided by a company called Retool. The Retool Convert CSV to JSON utility is very simple to use.
To convert your file, you can:
- Drag and drop the CSV file into the tool.
- Or click Upload CSV, and select the desired file.
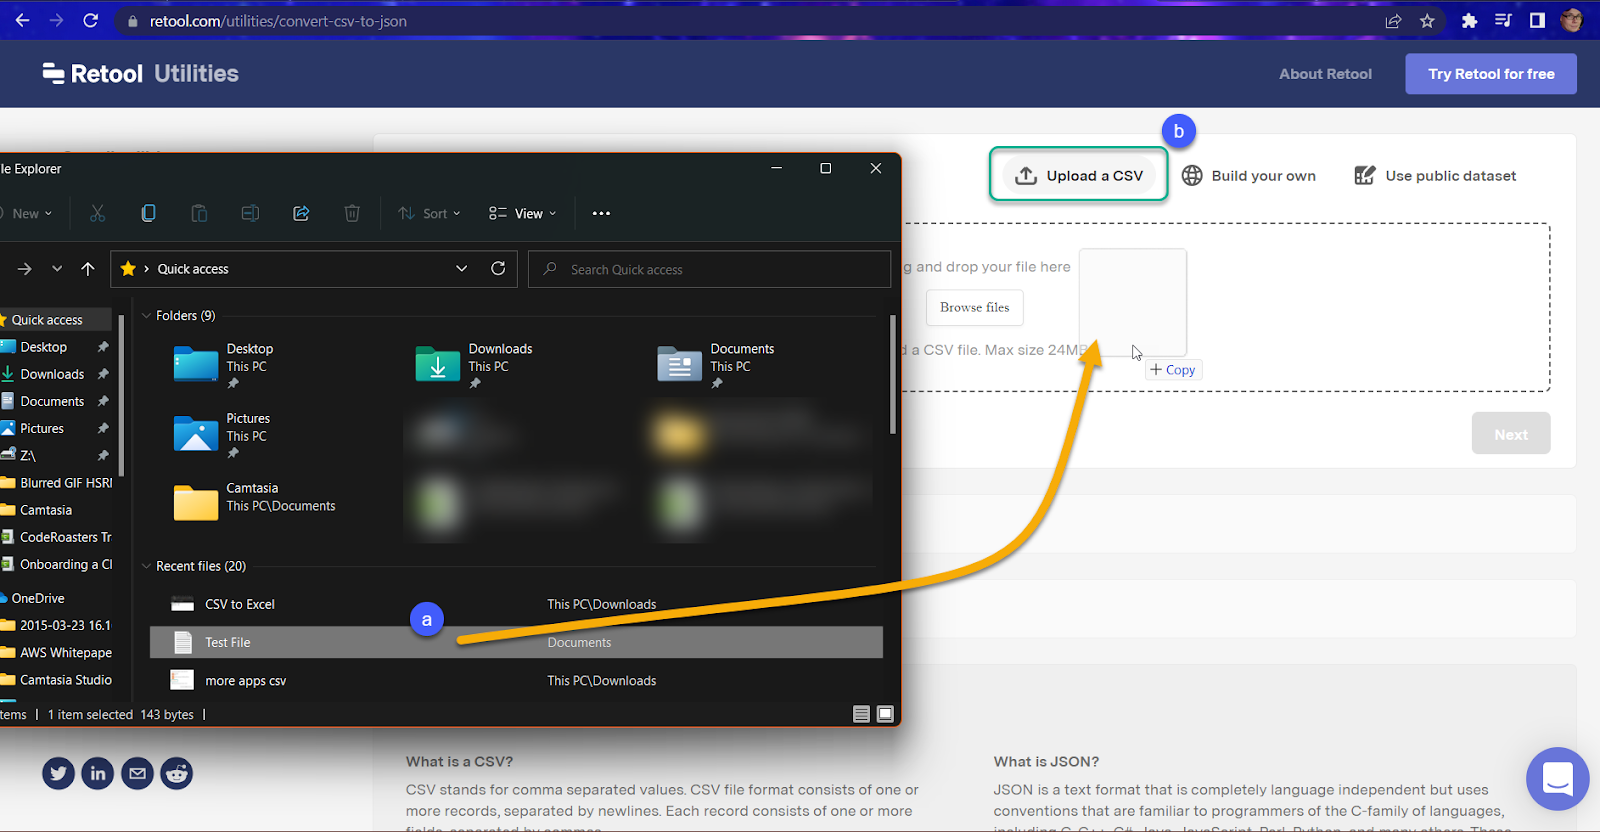
- Once it shows as uploaded, click Next.

- The tool then gives you the opportunity to ‘retool’ the data, pardon the pun. In other words, you can ensure the data appears in the expected format. In this case, there should only be three columns and three rows.

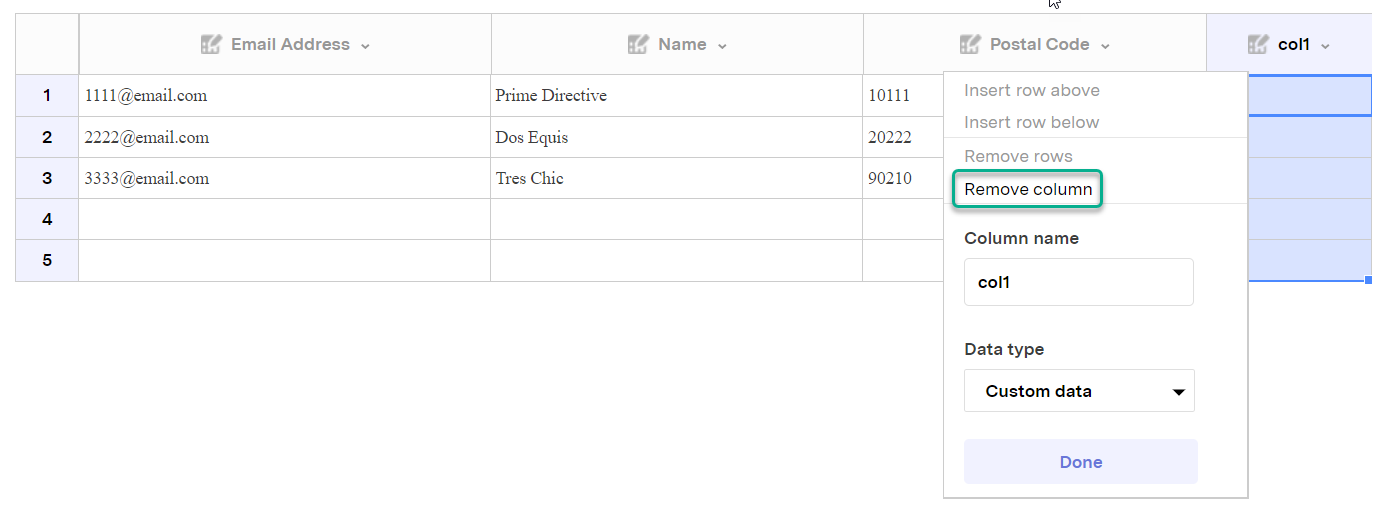
- In this example, we need to remove a column. Click the dropdown for the column and select Remove Column. As you can see, it is pretty intuitive.
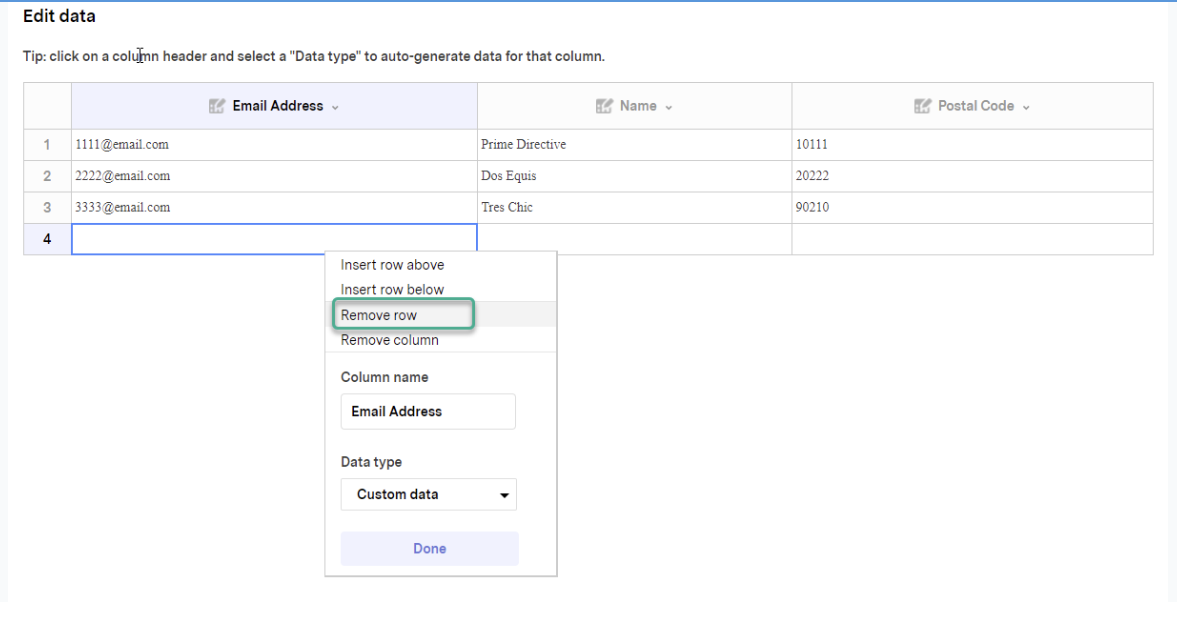
- A similar process can be done for removing the additional rows, save that for the rows it is a right-click to call the dropdown. Remove any unwanted rows one by one.
Once done, you can click “Copy JSON to clipboard”, and obtain the results. It’s that simple.
Another thing to take note of – As stated in the frequently asked questions at the bottom of the page, the Retool CSV to JSON utility cannot handle CSV files that have a line feed character at the end of each line.
JSON Formatter
If you simply google CSV to JSON numerous CSV to JSON formats will avail themselves, but I’ll leave you with one more option to save you the trouble. Another simple-to-use option is the CSV to JSON Converter.
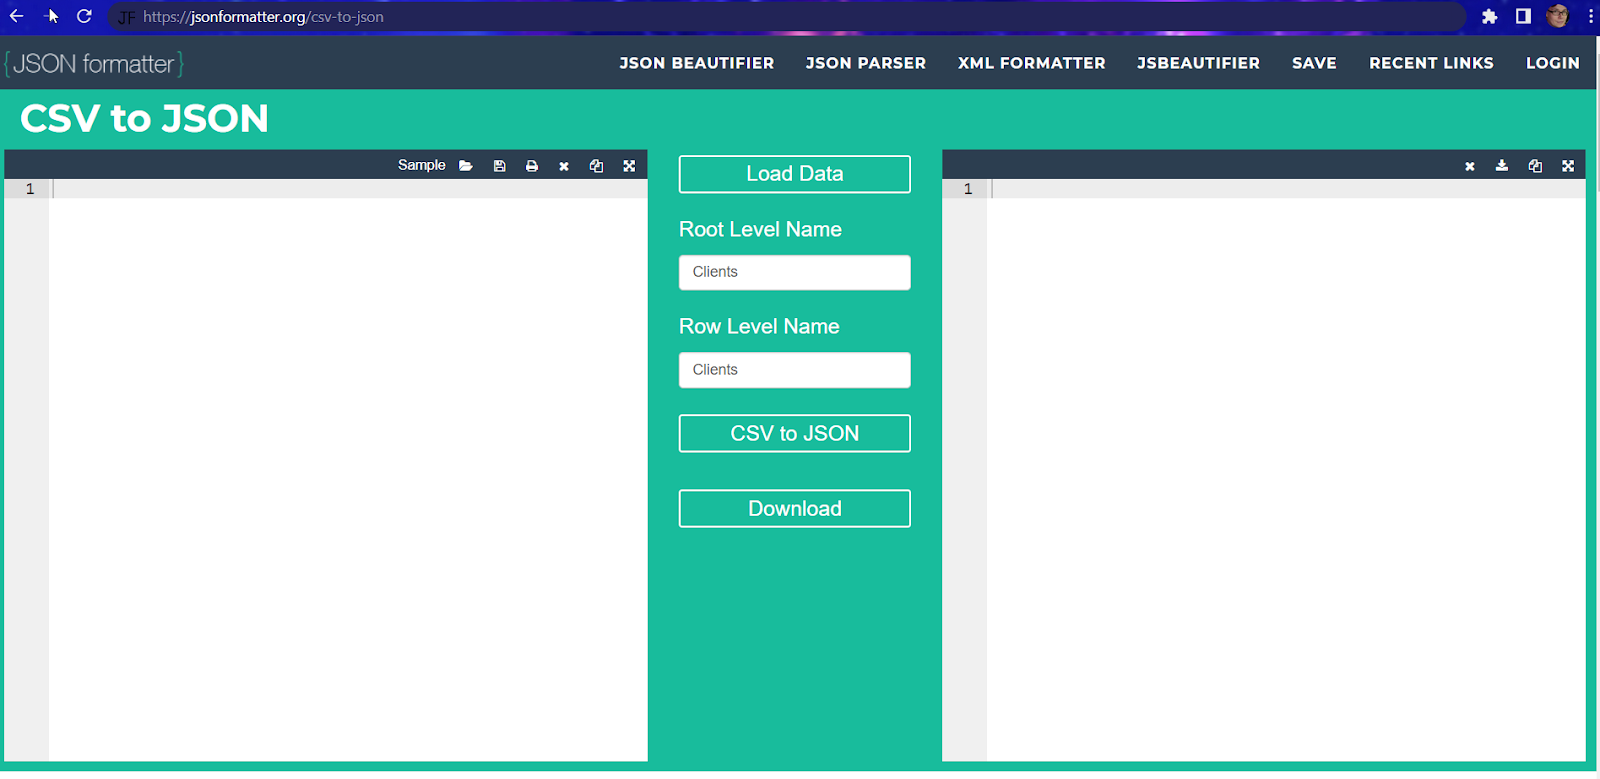
The advantage of this tool is that you can see the CSV and the JSON code side-by-side, allowing you to review the results in real-time. This is useful if:
- you are trying to learn JSON and want to see the correlation between the two formats.
- If you know JSON and want a fast conversion, but want to review the results.
Again, the tool is fairly simple to use. You can copy and paste the CSV into the converter, type it out (if creating one from scratch), or open an existing file from your PC using the folder icon.
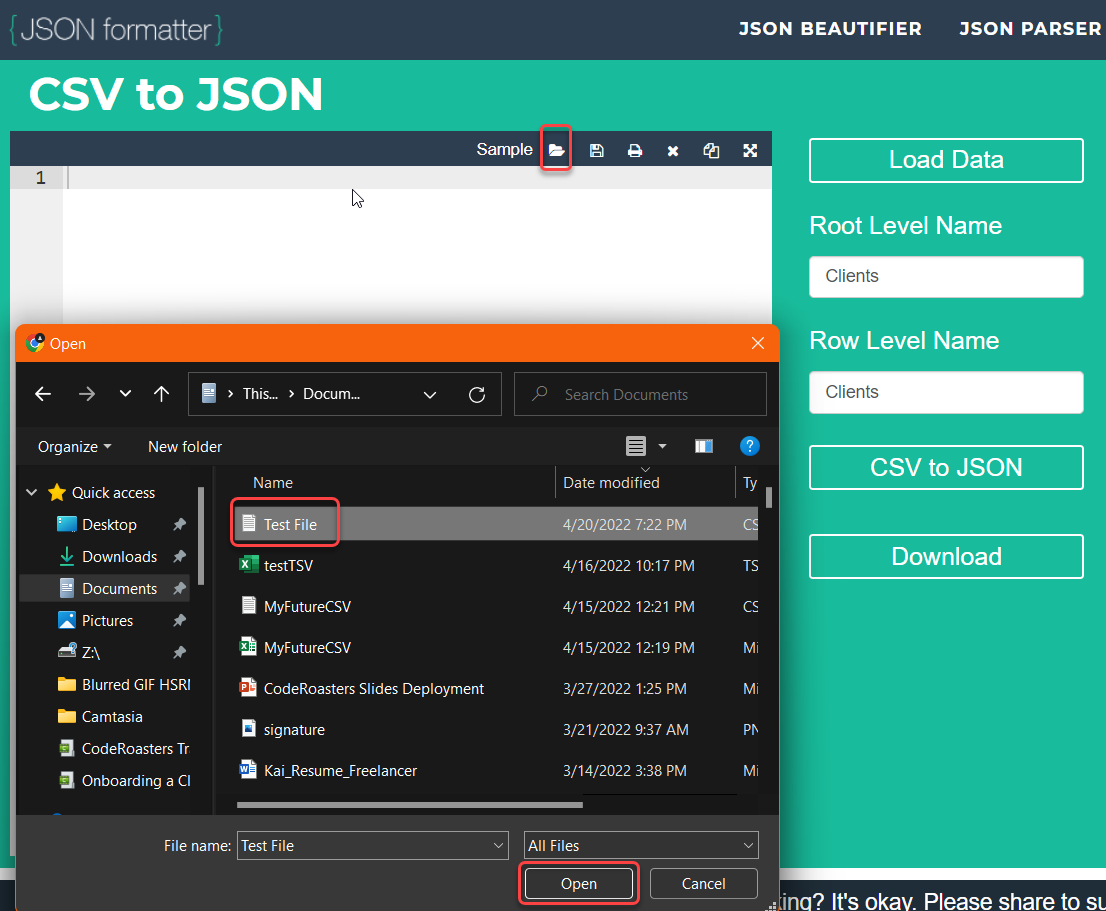
Once the file is opened, it will automatically perform the conversion.
img style=”display: block; width: 100% !important; height: auto !important;” src=”https://images.surferseo.art/bf020b2d-778e-4abd-8644-332de91e4f12.png” alt=”” />
You can review and edit on both sides of the tool, fixing any errors you see. You can also alter the root level name of the file you are creating. To apply changes to either side, simply click CSV to JSON again. You can then download the results, if you are happy with them, or copy them from the JSON results field in order to paste the results to another file or program.
JSON Validator
Now that you have two methods of obtaining JSON content from CSV, you may want to verify/validate it. If you do not have the experience to look over the code for yourself, or if you have a larger file that will take time to review, you might want a tool that can do the job for you. The JSON Formatter and Validator can help you with this.
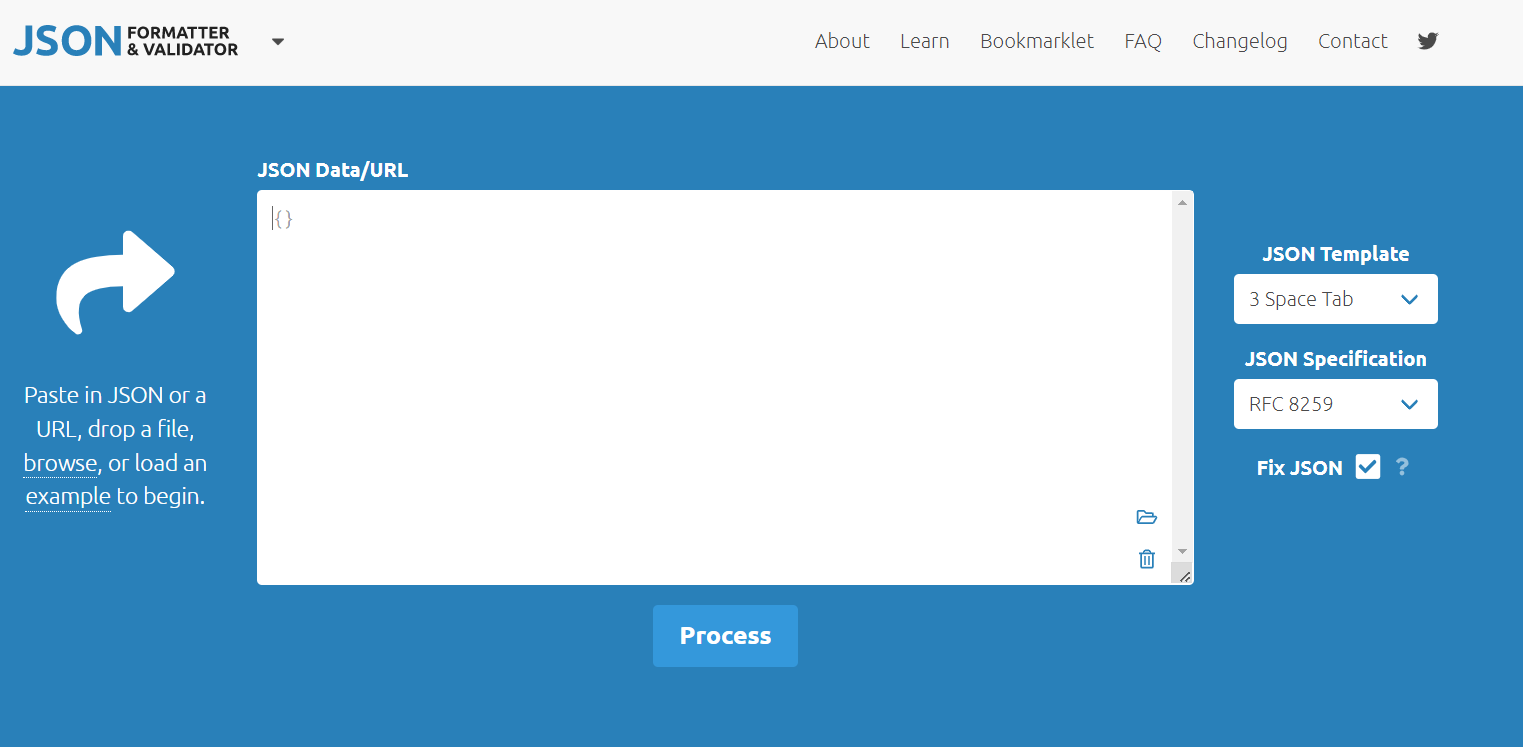
As the text under the arrow indicates, you can paste in the JSON content (we’ll use this option, and the content from the previous tool), drop a file, browse your computer, or load an example. Each option is linked from the said text. For example, if you want to browse your computer for a file, click the word browse. If you have the location open on your computer already, drag and drop the file.
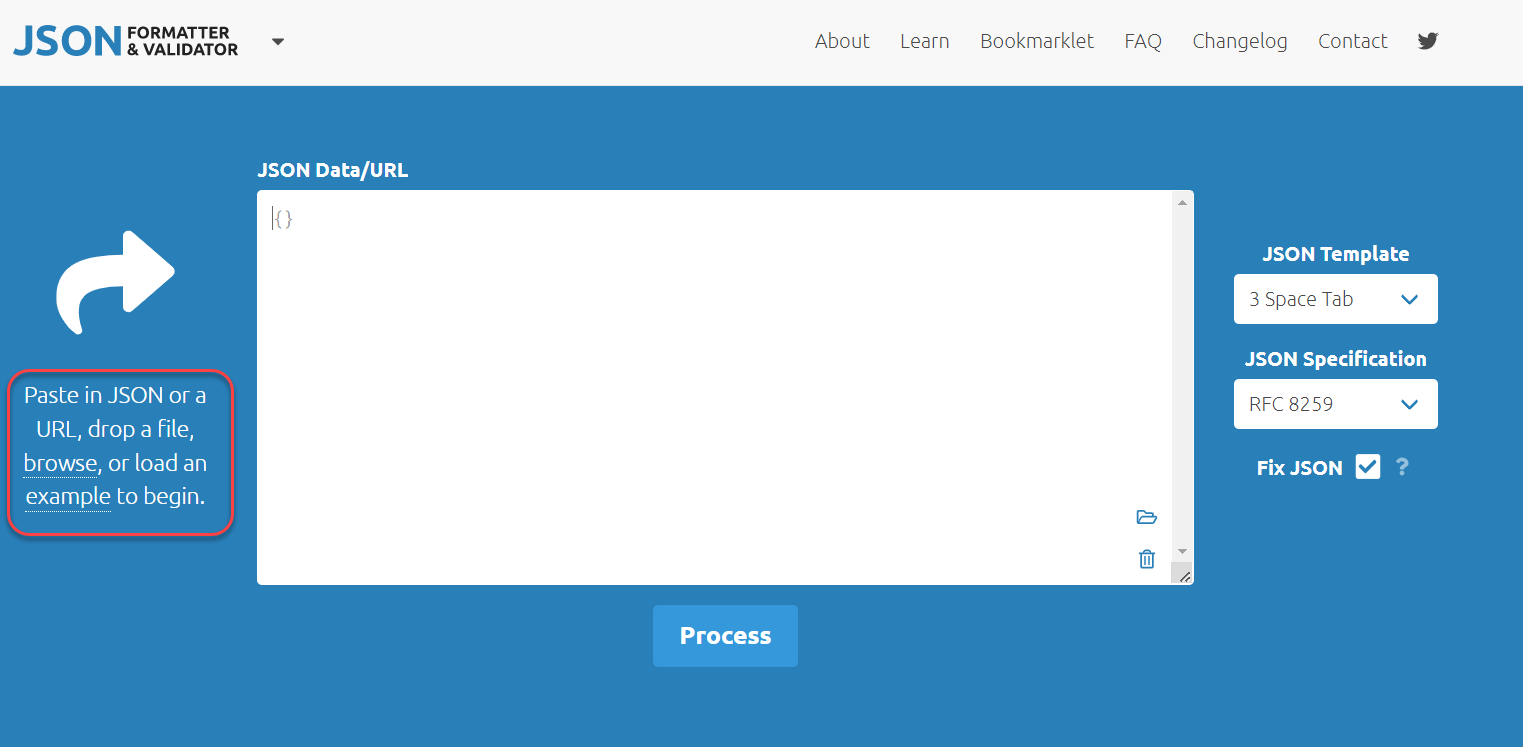
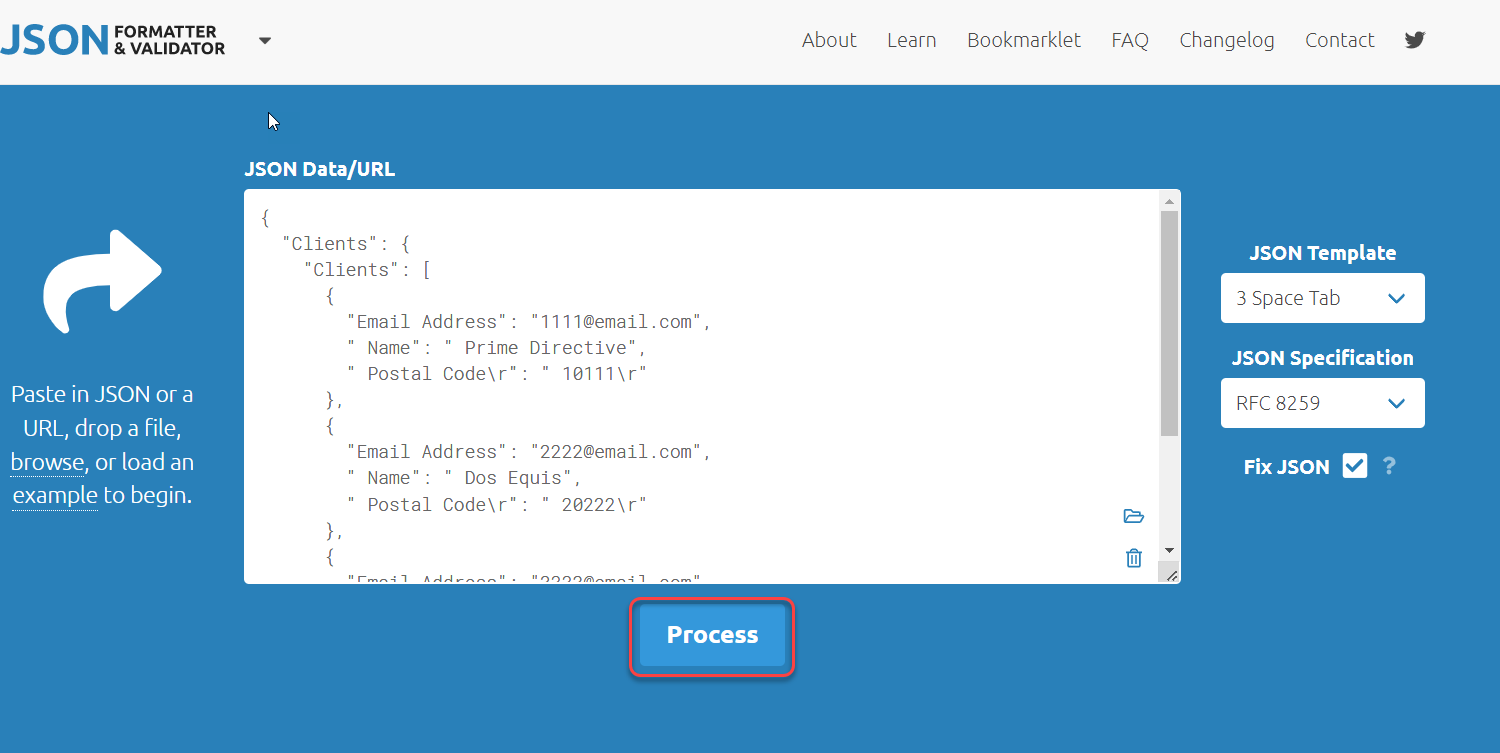
We will simply use the copy-and-paste option and paste the JSON results from the previous tool. Once the data is added, click Process.
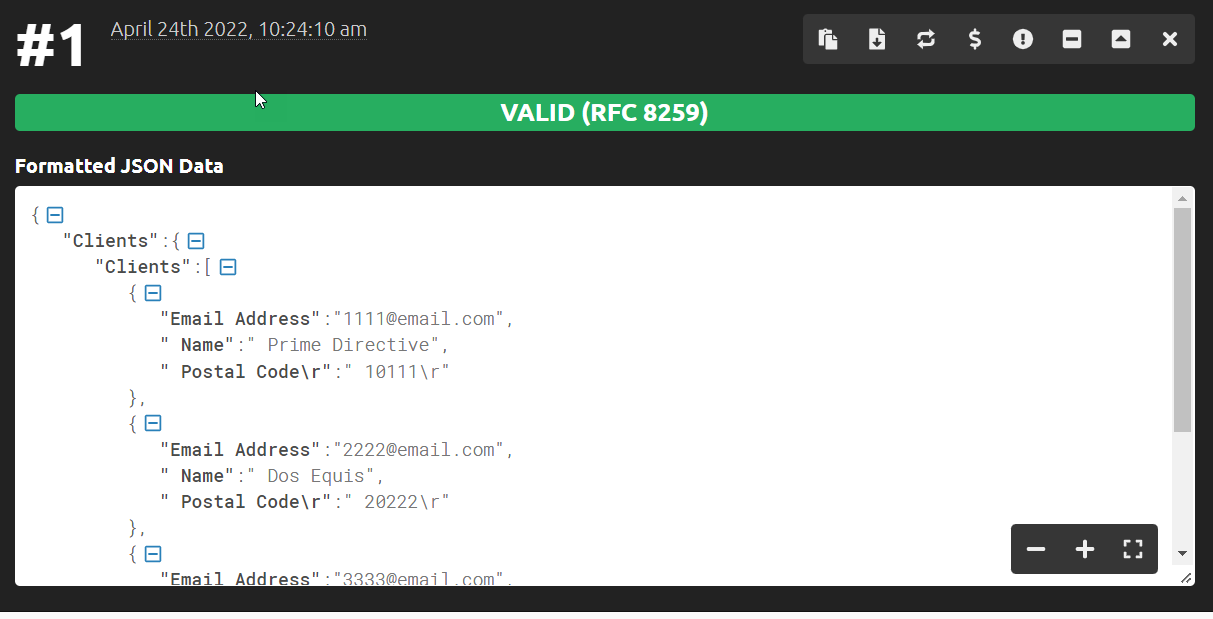
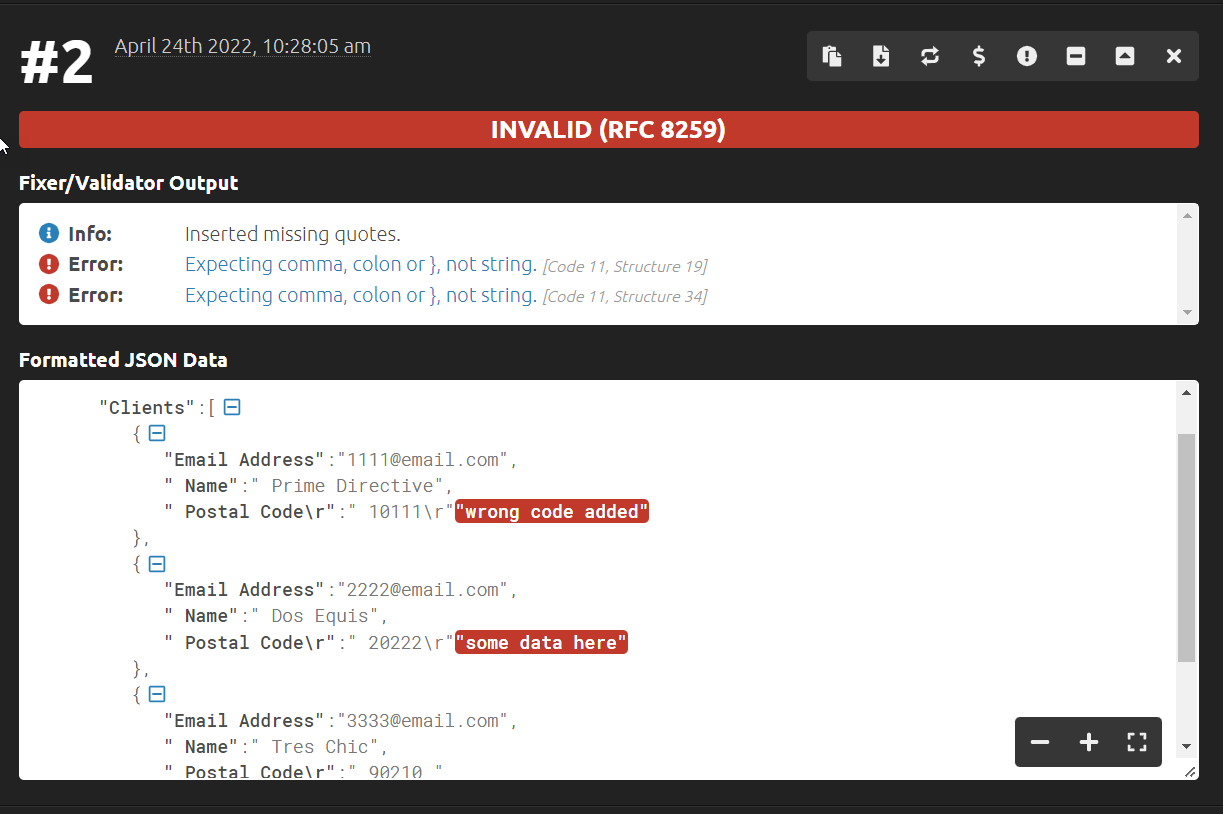
If the data proves valid, the process is complete. The results will appear below the converter.
If there are issues with the JSON code provided, they are highlighted in the results, allowing you to identify and remove the errors immediately. It also lists exactly what the error is. This is invaluable in a larger JSON file.
Converting from JSON to CSV
Just as there are tools on the internet to convert CSV files to JSON, there are also tools to go the other way. In the section on converting from CSV to JSON, we mentioned a tool called Retool. This site offers several different tools to convert files, including one to convert JSON to CSV.
Again, simply click Upload file, and select the desired JSON file, or drag and drop it into the box.
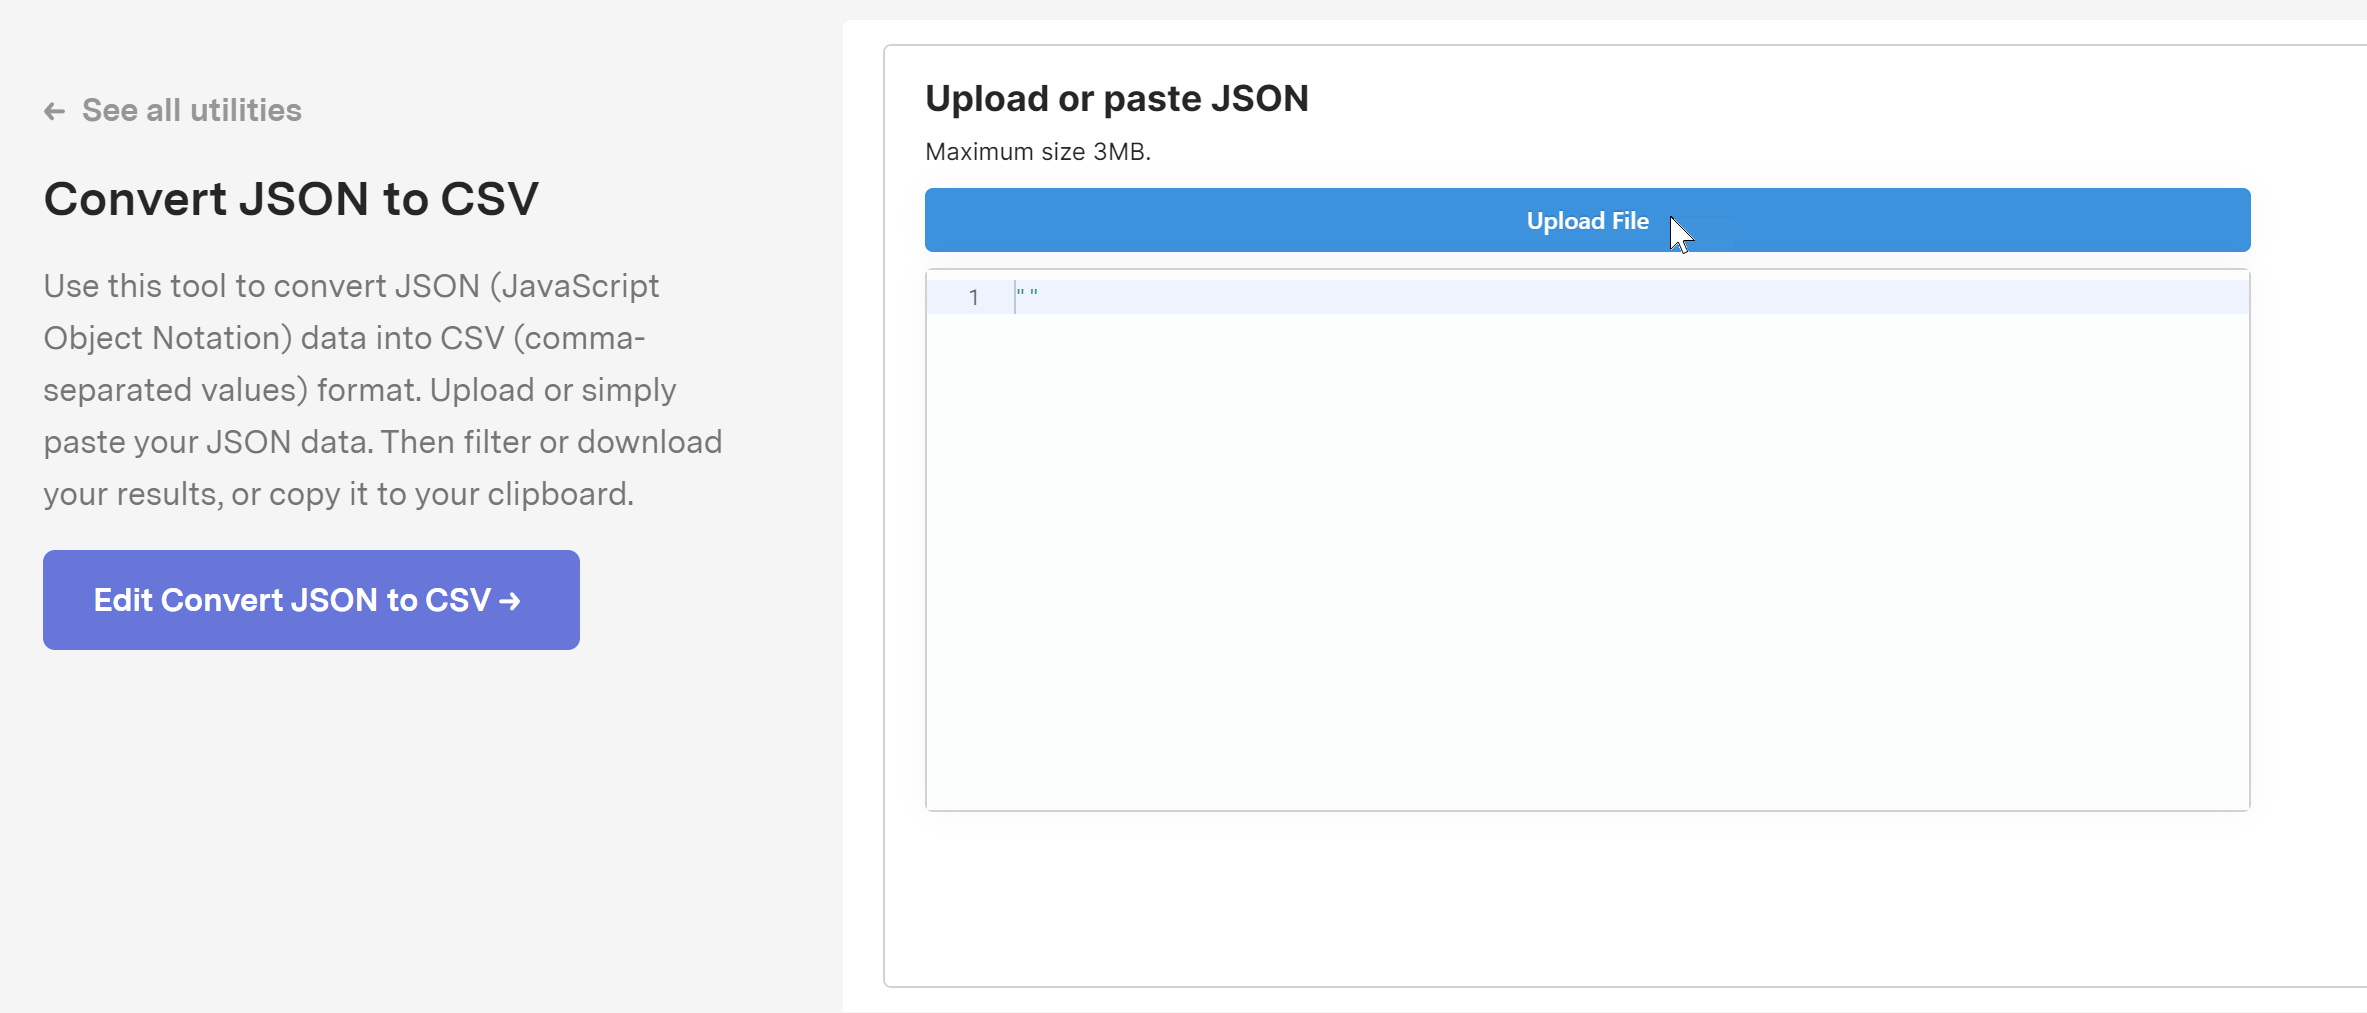
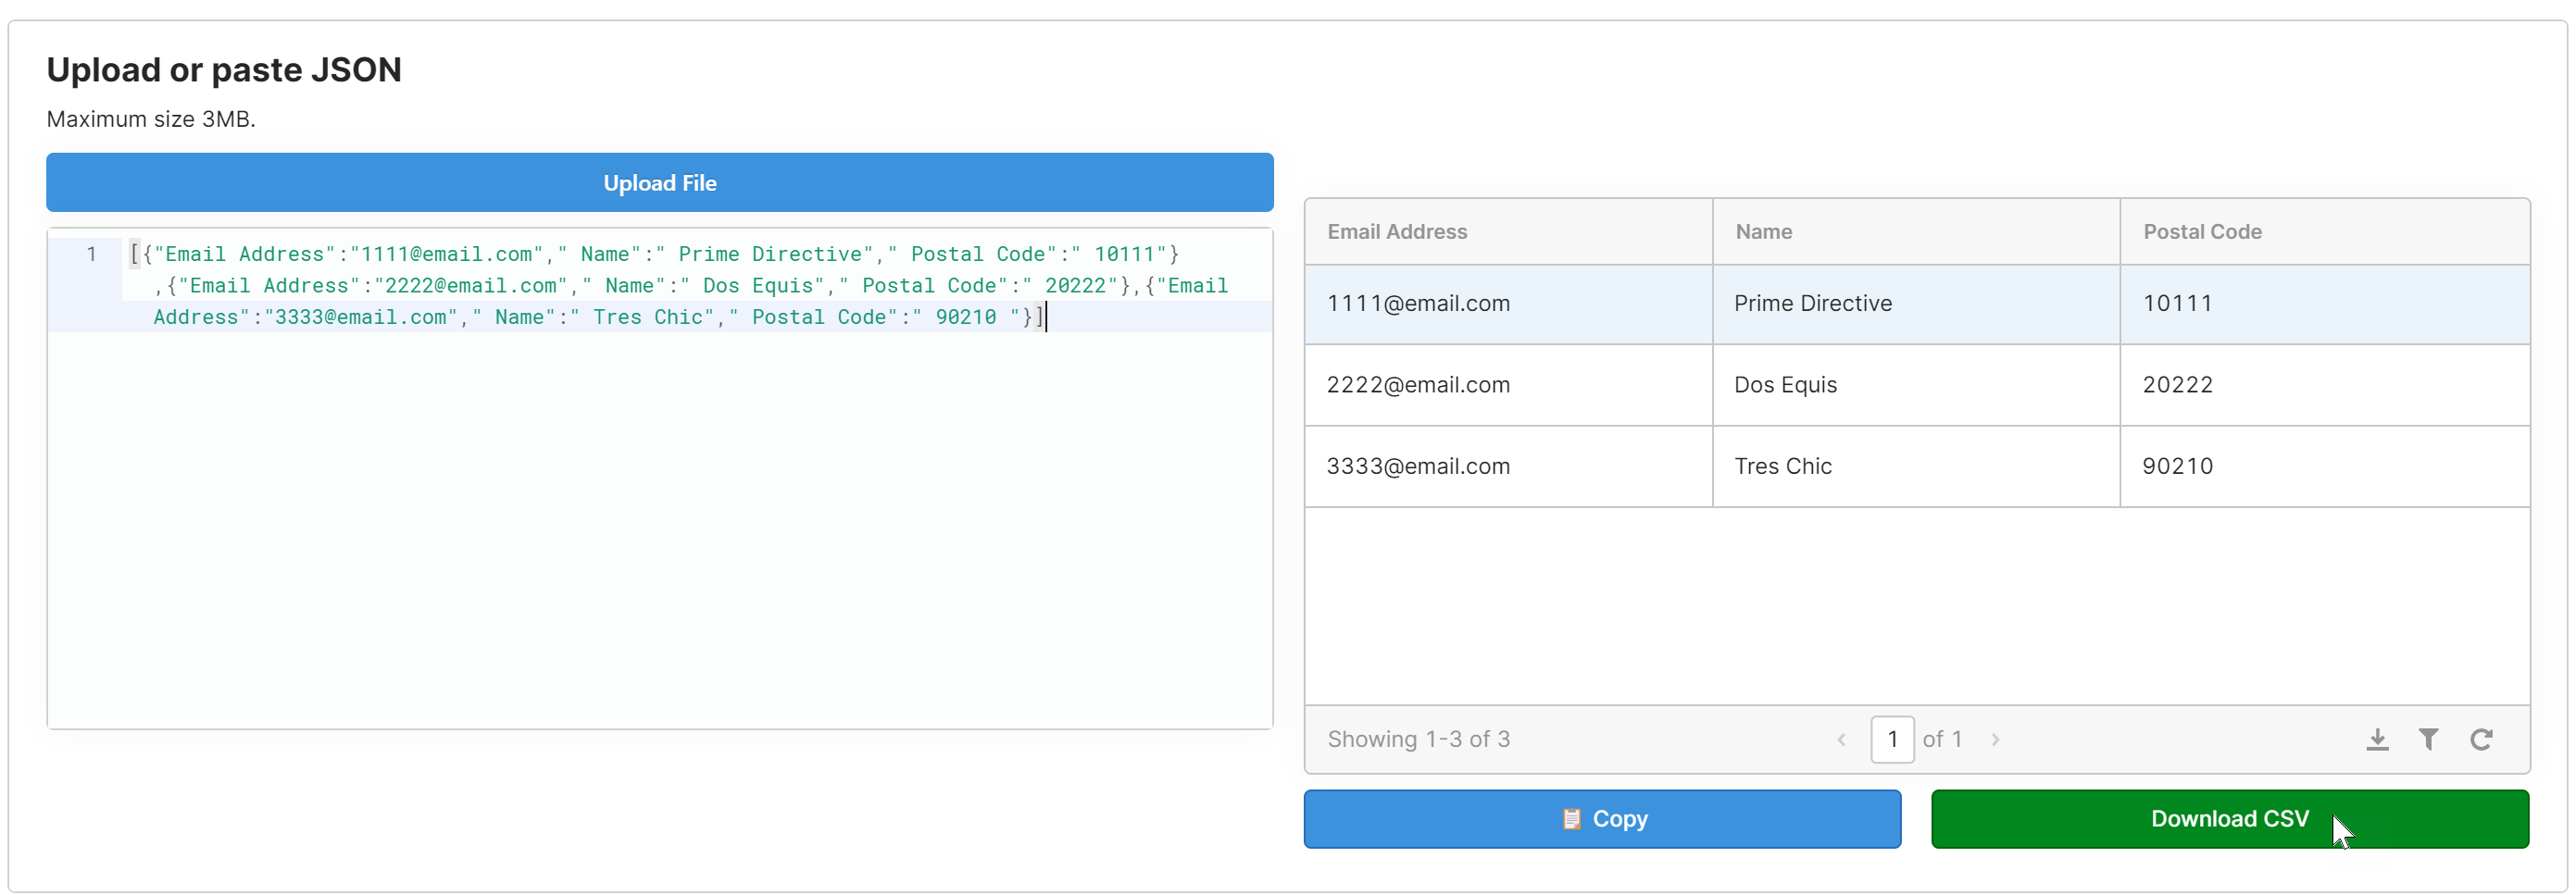
Once the file is uploaded, the JSON code will appear below, and it will show the CSV format to the right. You can verify it appears as it should, and can edit the JSON file if you see any issues. Otherwise, simply click Download CSV, and the process is complete.
Converting from Excel to CSV
See the section above, “How to Export a CSV File from Excel” to learn how to convert from Excel to CSV. Converting and exporting Excel to CSV is the same process. Just remember that you cannot export multiple sheets and must separate sheets into separate files first. Also, remember to check the properties of the file to ensure the file is properly converted.
Converting from CSV to Excel
To convert from CSV to Excel, simply reverse the process outlined in the previous section.
- Check the properties of the file to be sure it has not already been converted.
- Click File, then Save As.
- Save the file as Excel Workbook (*.xlsx)
Converting from CSV to XML
Excel spreadsheet is a truly versatile tool for handling CSV files. Not only can it convert from CSV to Excel and back, but it can also convert to other formats, including older versions of Excel, back to .txt, HTML, and of course XML.
As before, all you need to do is open the CSV file and click Save As. In the drop-down showing the file type, scroll down to select XML Data (.xml).
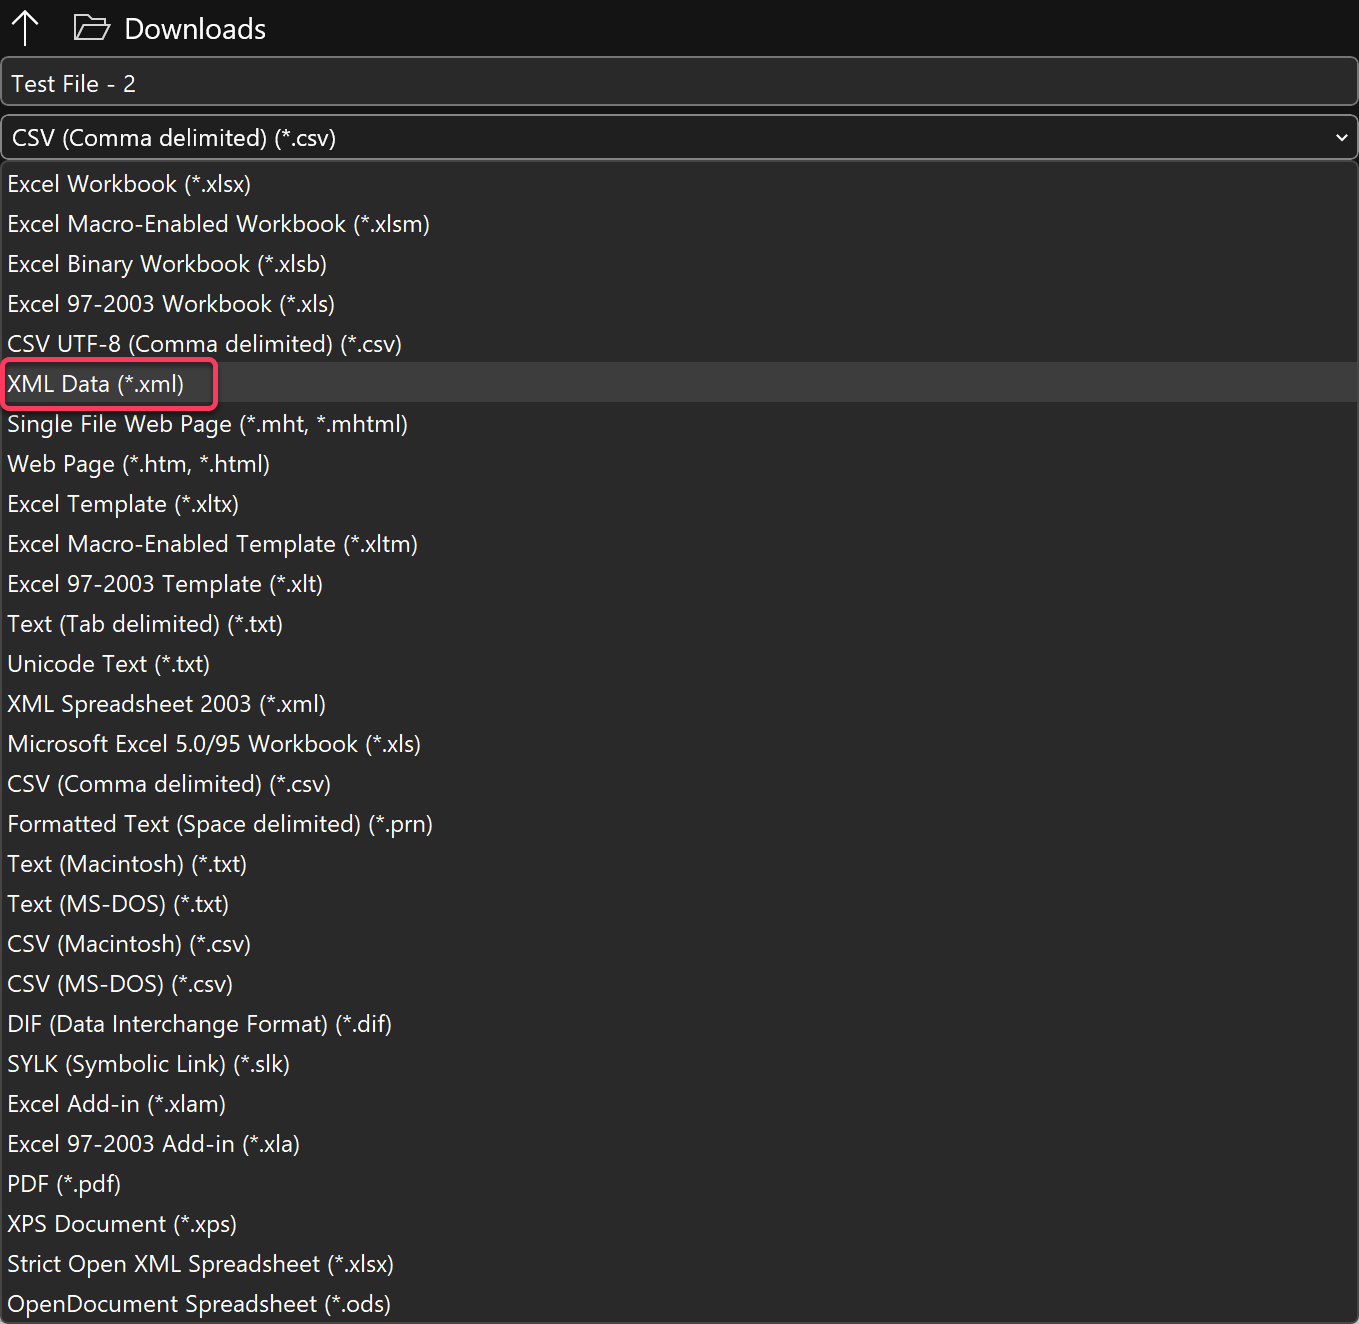
That’s all there is to it. The CSV file will be converted to XML.
Converting from XML to CSV
Again, use Excel to make this change. Open tabular data in XML format using Excel, click Save as, and select the desired CSV format from the dropdown the same way described in previous sections regarding Excel to CSV or CSV to XML.
Converting from CSV to SQL
A strong tool for converting CSV to SQL can be found at convertcsv.com. Scroll down, and enter or paste the CSV data in the space provided.
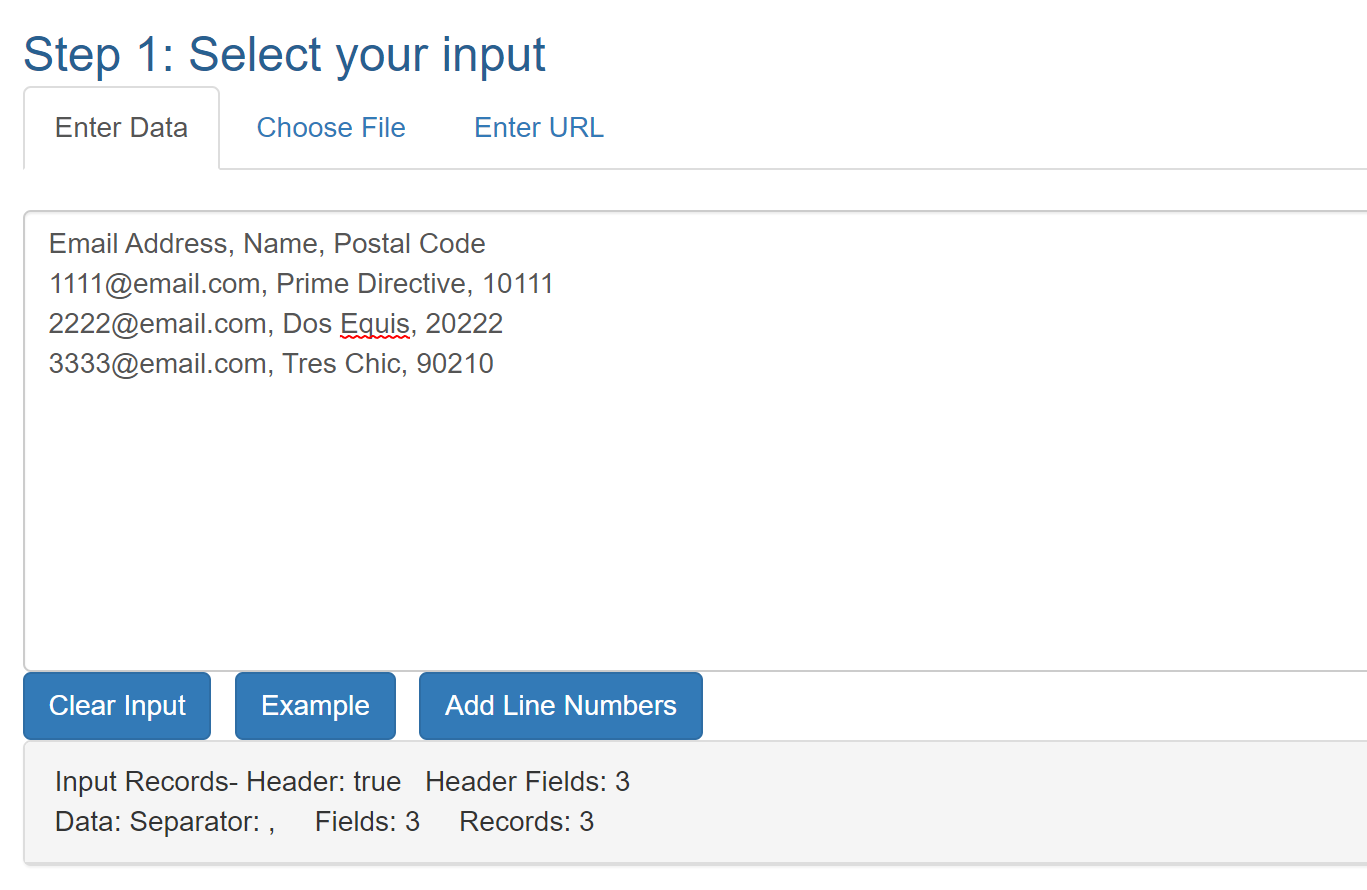
Next, choose input options. This converter can be set to recognize alternative formats of CSV such as semi-colon delimited, tab-delimited, or other options. For standard comma-separated, you can use the auto-detect option. Additional options are included for more complex CSV variants and data.
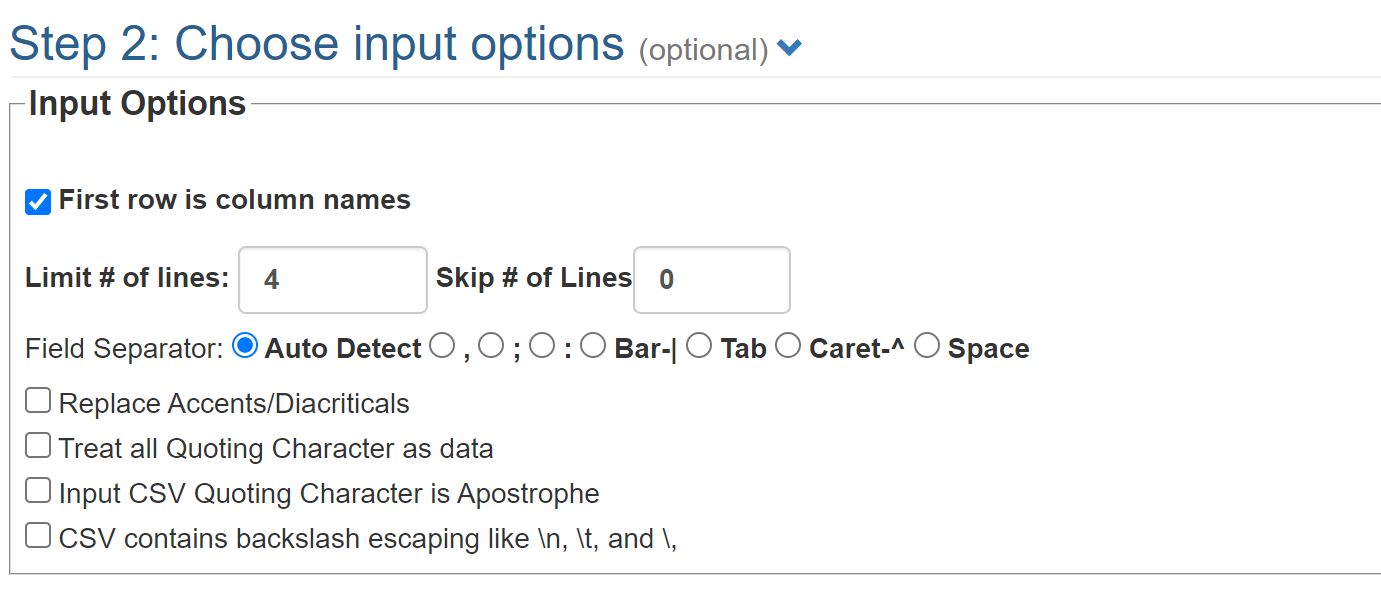
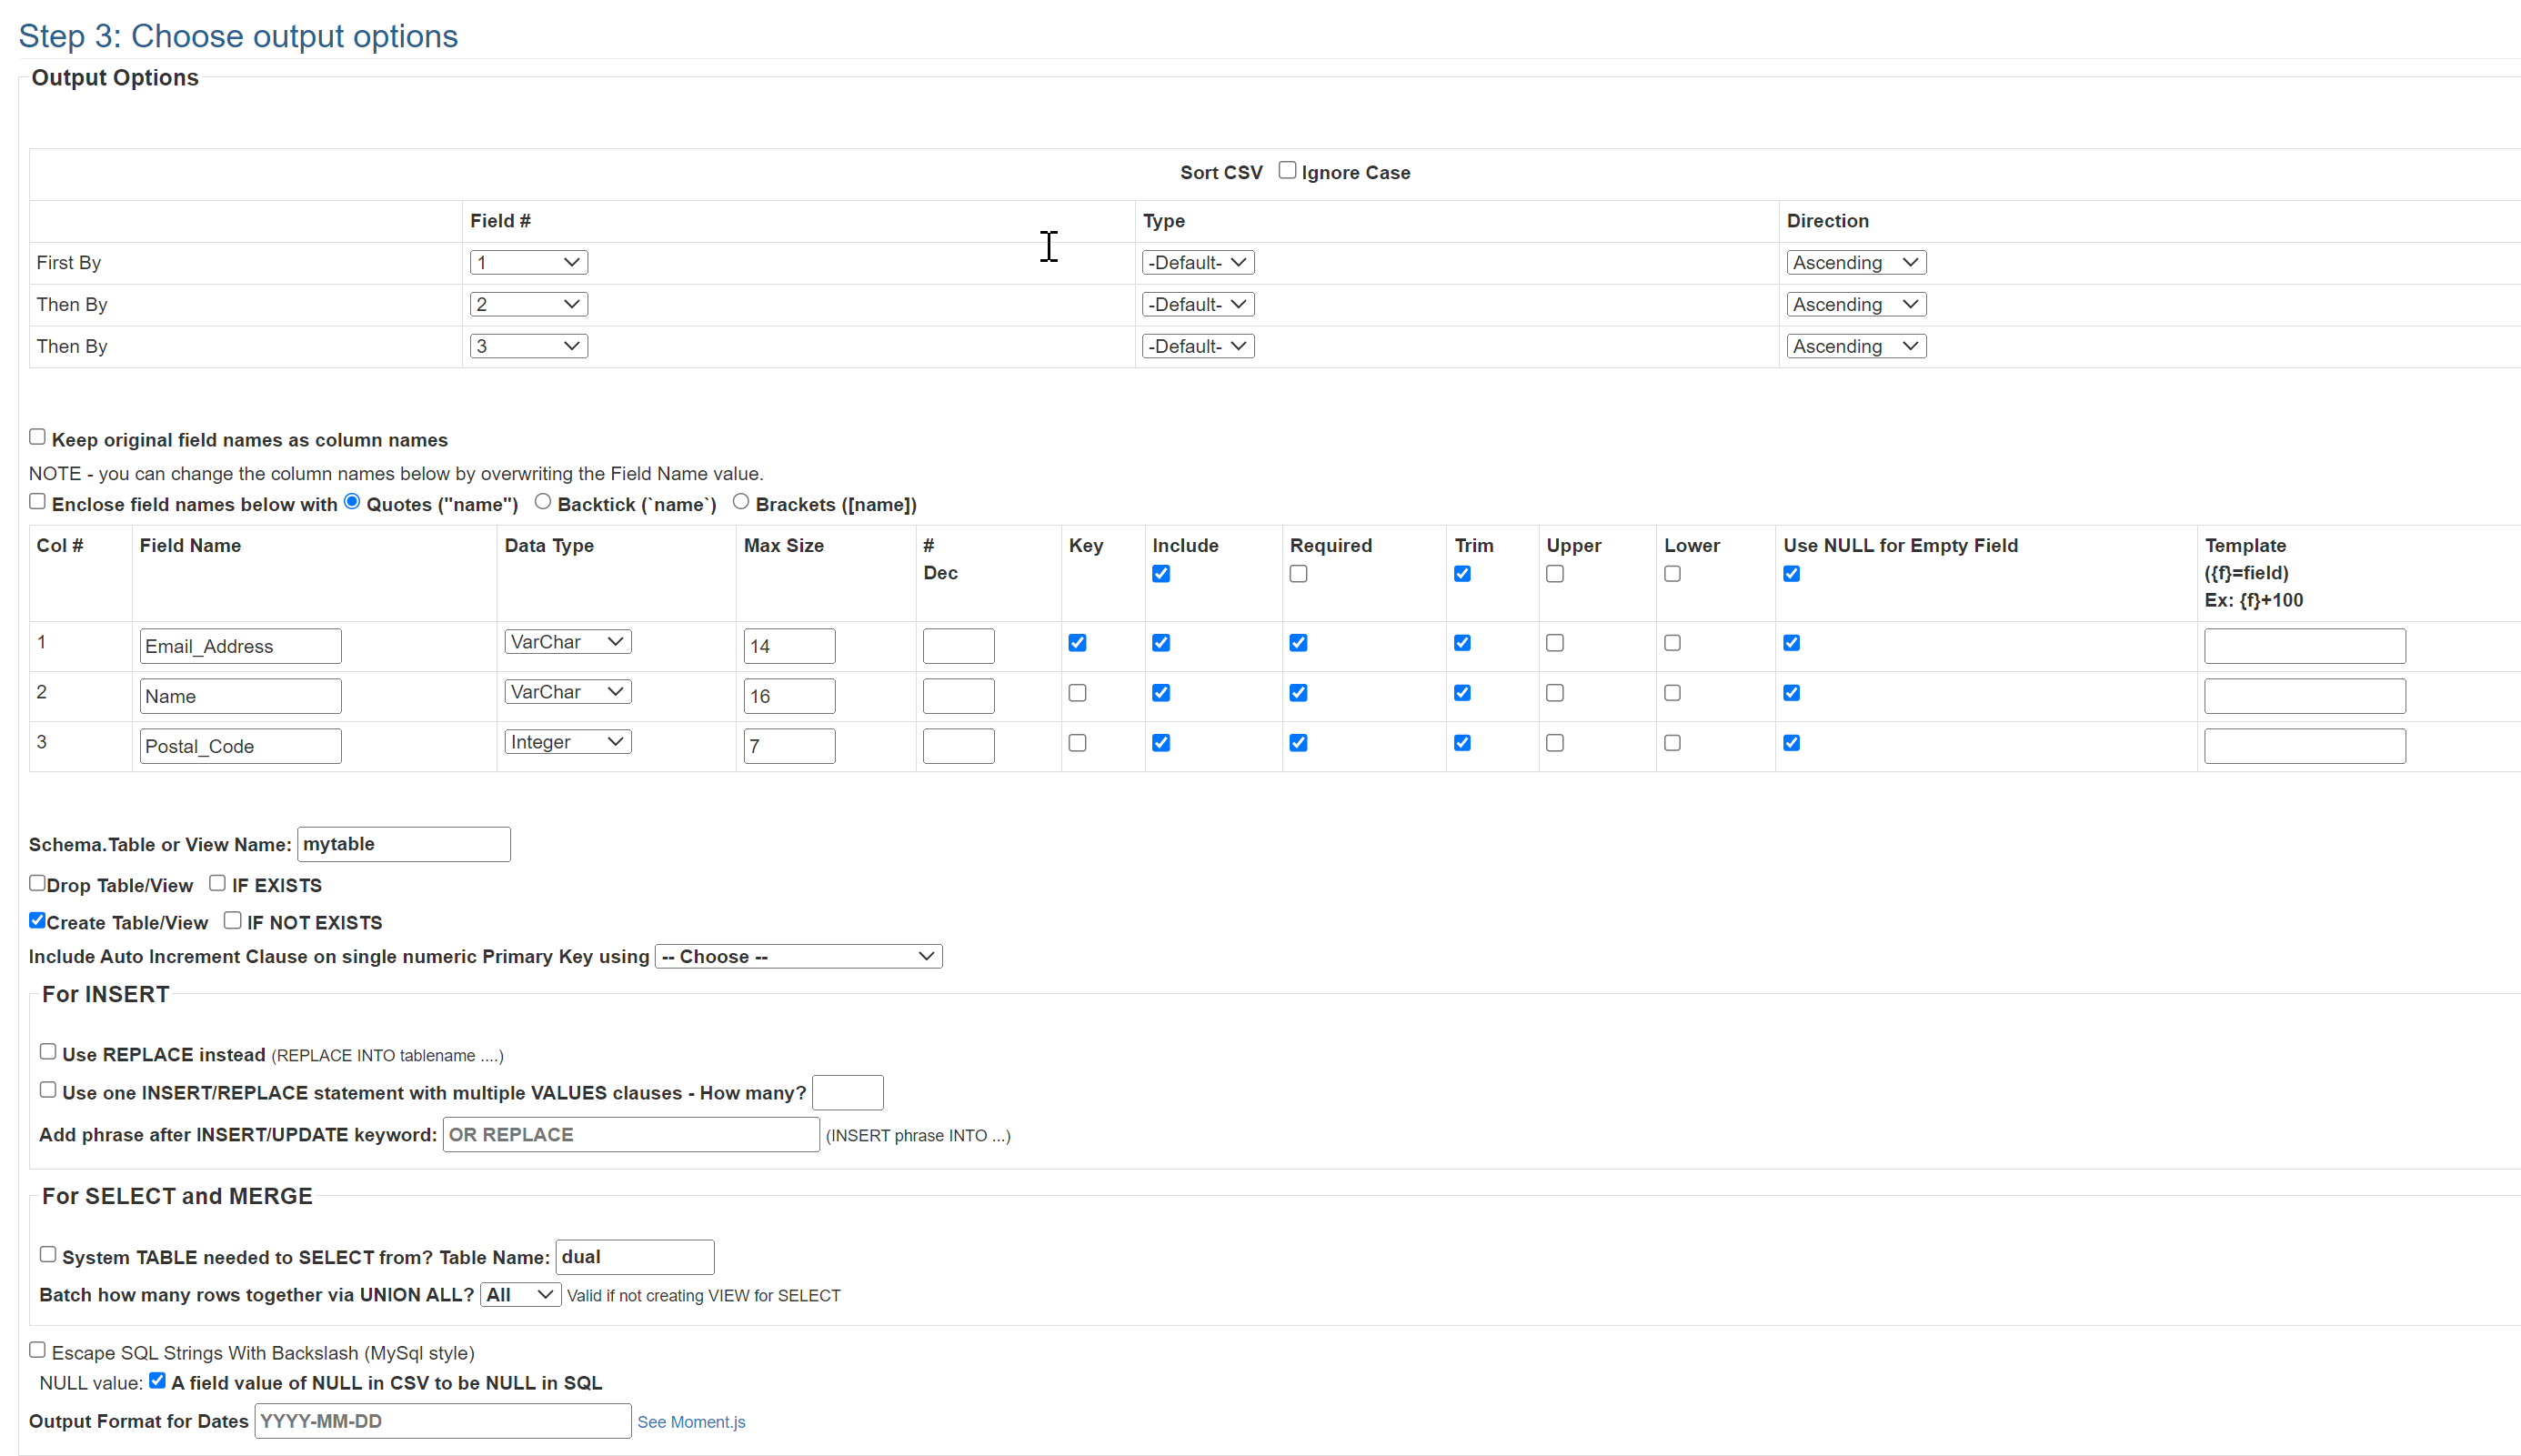
Next, set the desired output options.
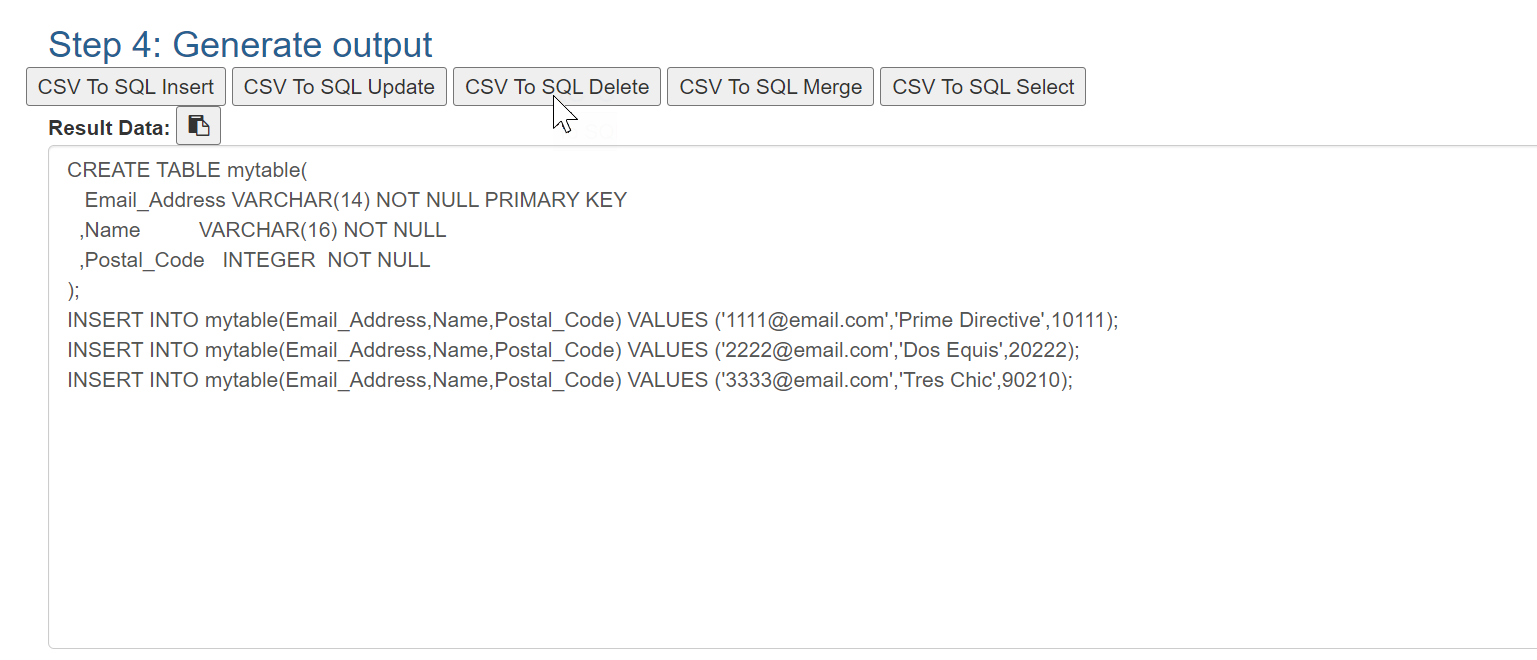
Select the desired SQL output. Options include:
- SQL Insert
- SQL Update
- SQL Delete
- SQL Merge
- SQL Select
Converting from SQL to CSV
The same convertcsv.com site offers a tool to convert the other direction as well, SQL to CSV. Because CSV is a much simpler format, this tool is much simpler. Again, provide the SQL code in the provided input field.
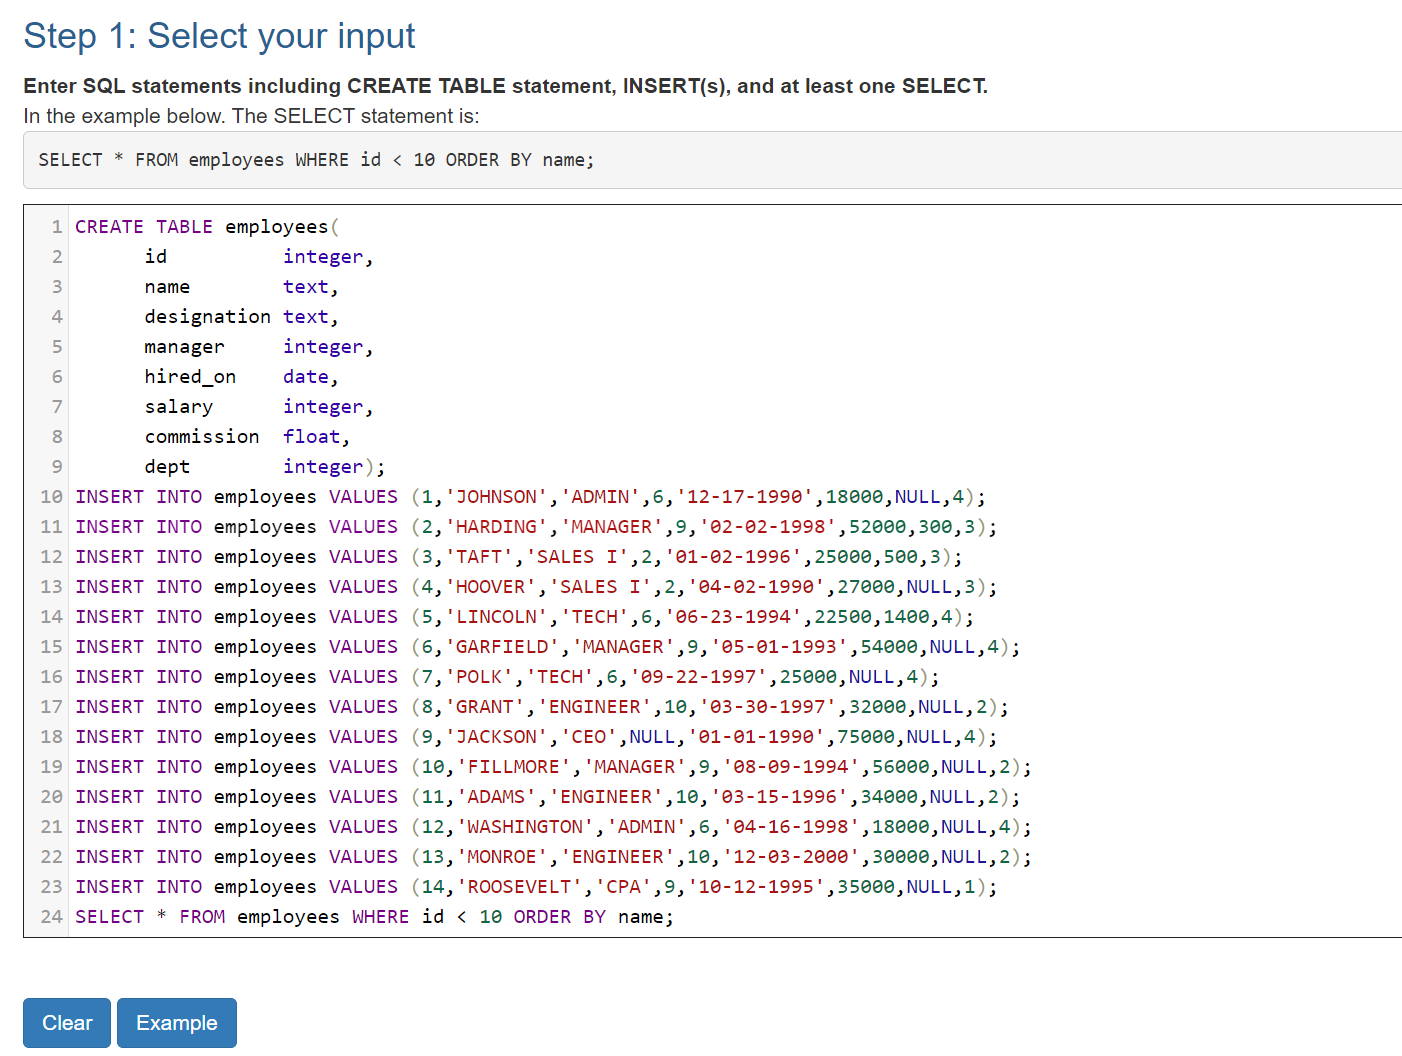
Click Convert to CSV, or to any of the other options provided.
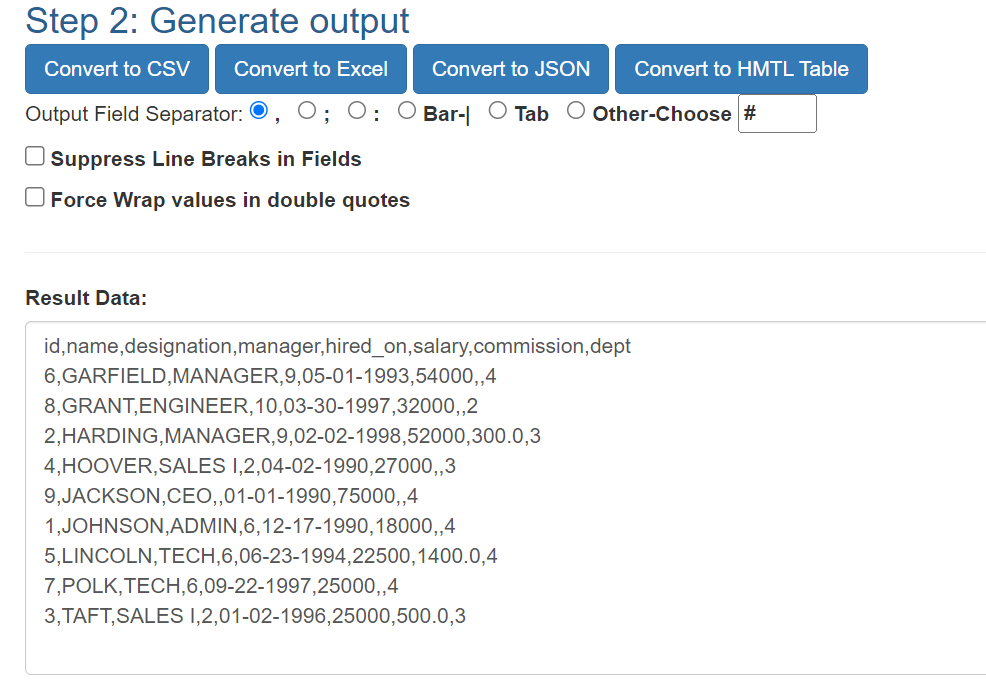
Save the results in the format desired by clicking Download Result.

Advantages of the CSV File Format
- Human readable and human writable – It is a simple format to learn, even accounting for more complicated additions such as quotation marks. It is not encoded or converted into bits and bytes and can be easily edited.
- Widely used and compatible everywhere – People from every walk of life and industry are used to working with CSV files. It is not restricted to PC or Mac users or any OS. It can be edited or read in any text editor or spreadsheet program.
- Simple schema – Databases can crunch numerical data without requiring much computing power.
- Fast – Because of the simplicity of the format, it is not taxing for the parser to parse the data. This means data read and write operations are quick and painless.
- Business-friendly – Because it is so prevalent, it is the best choice if you want a format accessible and readable by everyone. The goal of any business is to reach the most clients, and the CSV format is perfect for that goal.
Challenges to the CSV File Format
As with any protocol, there are some challenges to the CSV format. One of the most problematic is the lack of standardization. While there have been efforts to standardize the format, notably RFC 4180, and several revisions in the years to follow, it is still ill-defined. It can experience difficulties with special characters or characters from other languages (such as vowels with accents and other differences). Older versions of CSV could not handle fields with commas, assuming these were column delimiters in and of themselves. Quotations were introduced to handle these cases, but the more complex the data, the more challenging it could be to express in a standardized CSV format.
Another challenge is that other types of delimited text formats are lumped in with comma-separated (or comma-delimited) values, including pipe-delimited, tab-delimited, and semi-colon-delimited versions of the format. While they sometimes have different extensions (.tsv, for example), they are often considered CSV.
These alternative versions can be challenging to convert and save manually because a simple “search and replace” operation cannot be safely used. There may be commas within the data that do not serve as delimiters or some of the same variables mentioned earlier that can cause problems for CSV, such as special characters.
Tools for Importing CSV Files
One of the most common use cases for importing CSV files is uploading customer contacts. For example, if creating a campaign for email or phone marketing campaigns, the call center or email marketing software may accept a CSV import to tell it where the emails should be sent. Online tax software might also accept CSV or Excel Spreadsheet data for import. CRMs such as HubSpot or Nutshell also allow you to upload a list of customers or contacts. For a robust user experience, platforms should use an off-the-shelf CSV importer.
Many more solutions use and/or accept CSV as an import format. Each will have its own template and may use a specific version of CSV. It is essential to be cognizant of the different issues that can arise in the import process and to consider any processes or products that can streamline it for your customers, such as Flatirons Fuse, which can help you avoid the most common CSV importer mistakes.
Summary
CSV is one of the world’s most commonly used file formats today and has been for over three decades. Because of the many advantages we discussed today, it will not likely go away anytime soon. As with any software, it is prone to human error and has seen a lot of changes over the years, resulting in many solutions to common problems. Some of these have resulted in non-standard file formats that get lumped in with CSV, older versions that are not as flexible, and other potential issues.
Whether the reason is the format, version, or human error, sometimes the transferability (the critical advantage of the CSV format) can be compromised. To mitigate these issues, Flatirons Fuse has created a product to help automate the import of CSV files to your website or web application solution, ensuring a streamlined onboarding process by preventing frustrations with the import of your customer’s data.
Professional CSV Import Solution
Flatirons Fuse is an enterprise-grade, embeddable CSV import solution.
Get the CEO's Take
Handpicked tech insights and trends from our CEO.
Professional CSV Import Solution
Flatirons Fuse is an enterprise-grade, embeddable CSV import solution.
Get the CEO's Take
Handpicked tech insights and trends from our CEO.

Enterprise Computing: Transforming Business Operations
Flatirons
Oct 09, 2025
Best Data Analytics Strategy for Business Growth
Flatirons
Aug 25, 2025
Team Lead vs Manager: Understanding the Key Differences
Flatirons
Aug 07, 2025
Exploring the Crucial Stages of a Startup Journey
Flatirons
Jul 16, 2025
Business Intelligence Benefits: Unlock Data-Driven Growth
Flatirons
Jul 08, 2025
Cloud Computing Strategy: Unlock Business Growth Potential
Flatirons
Jul 07, 2025