ALL ARTICLES
SHARE

Create a React.js CSV Importer in Minutes

author-avatar
Development
11 min read

Updated: June 23, 2023

Flatirons Fuse is a powerful embedded CSV importer that makes importation painless. Let’s create a React.js CSV importer!

Getting Started: Creating a Template

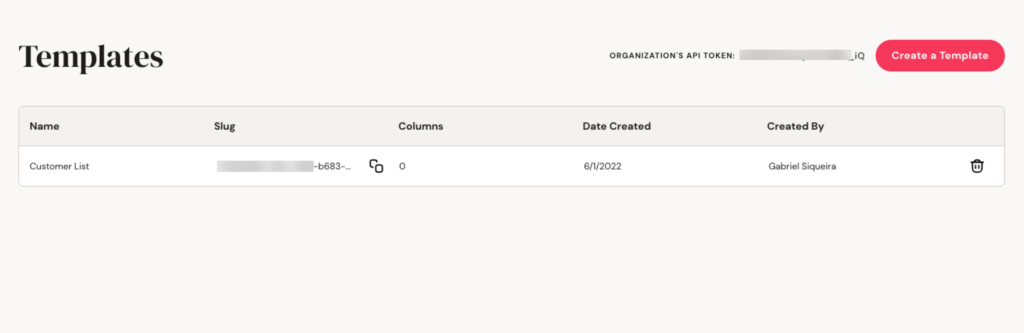
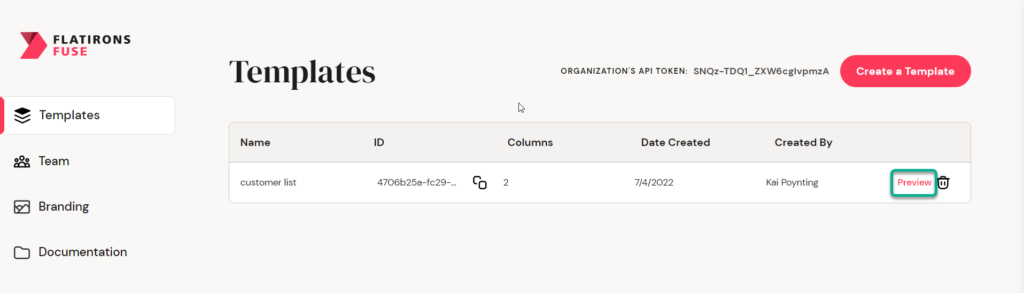
To begin, we must first register an account in the Flatirons Fuse app here, after which we can go to the Templates page and build our first Template. A Template represents the fields that your own system accepts, also known as your data schema. We will call our Template “Customer List” as shown below:

Flatirons Fuse app customer list template

For the sake of this example, let’s add two columns to our Template, Customer Name, and Customer Email, as seen below:

Adding columns to Flatirons Fuse app Template

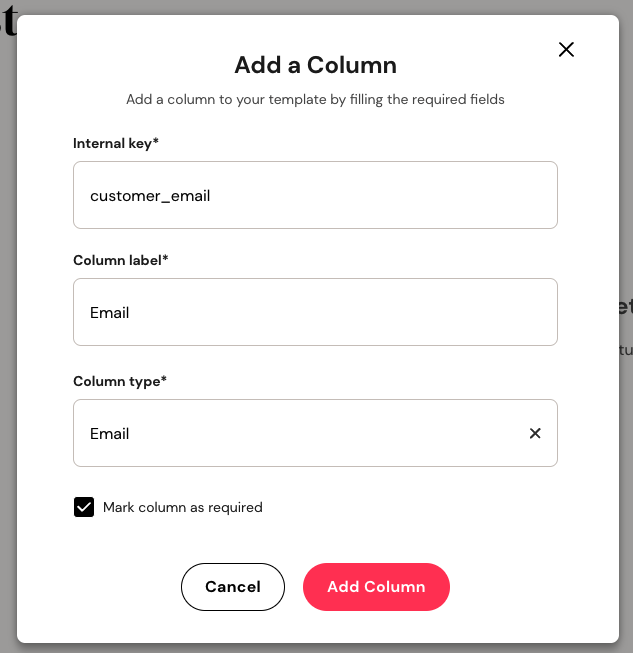
The “internal key” must be specified to match the column key in your data schema, column label is used to show in our spreadsheet and match the CSV header, and for column type, we can choose many different data types, and the required checkbox marks our column as required.

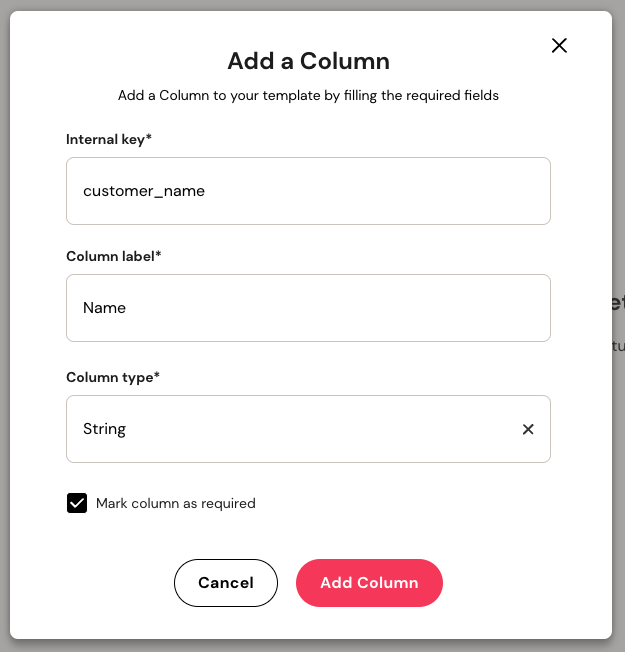
So, for our column “Customer Email”, we must use the “Email” data type. This will ensure that when your customers upload data, they upload valid emails. For “Customer Name”, we can just use “String” as a data type like below. Let’s mark both as required.

Flatirons Fuse app adding names to columns template

Flatirons Fuse app Template Columns

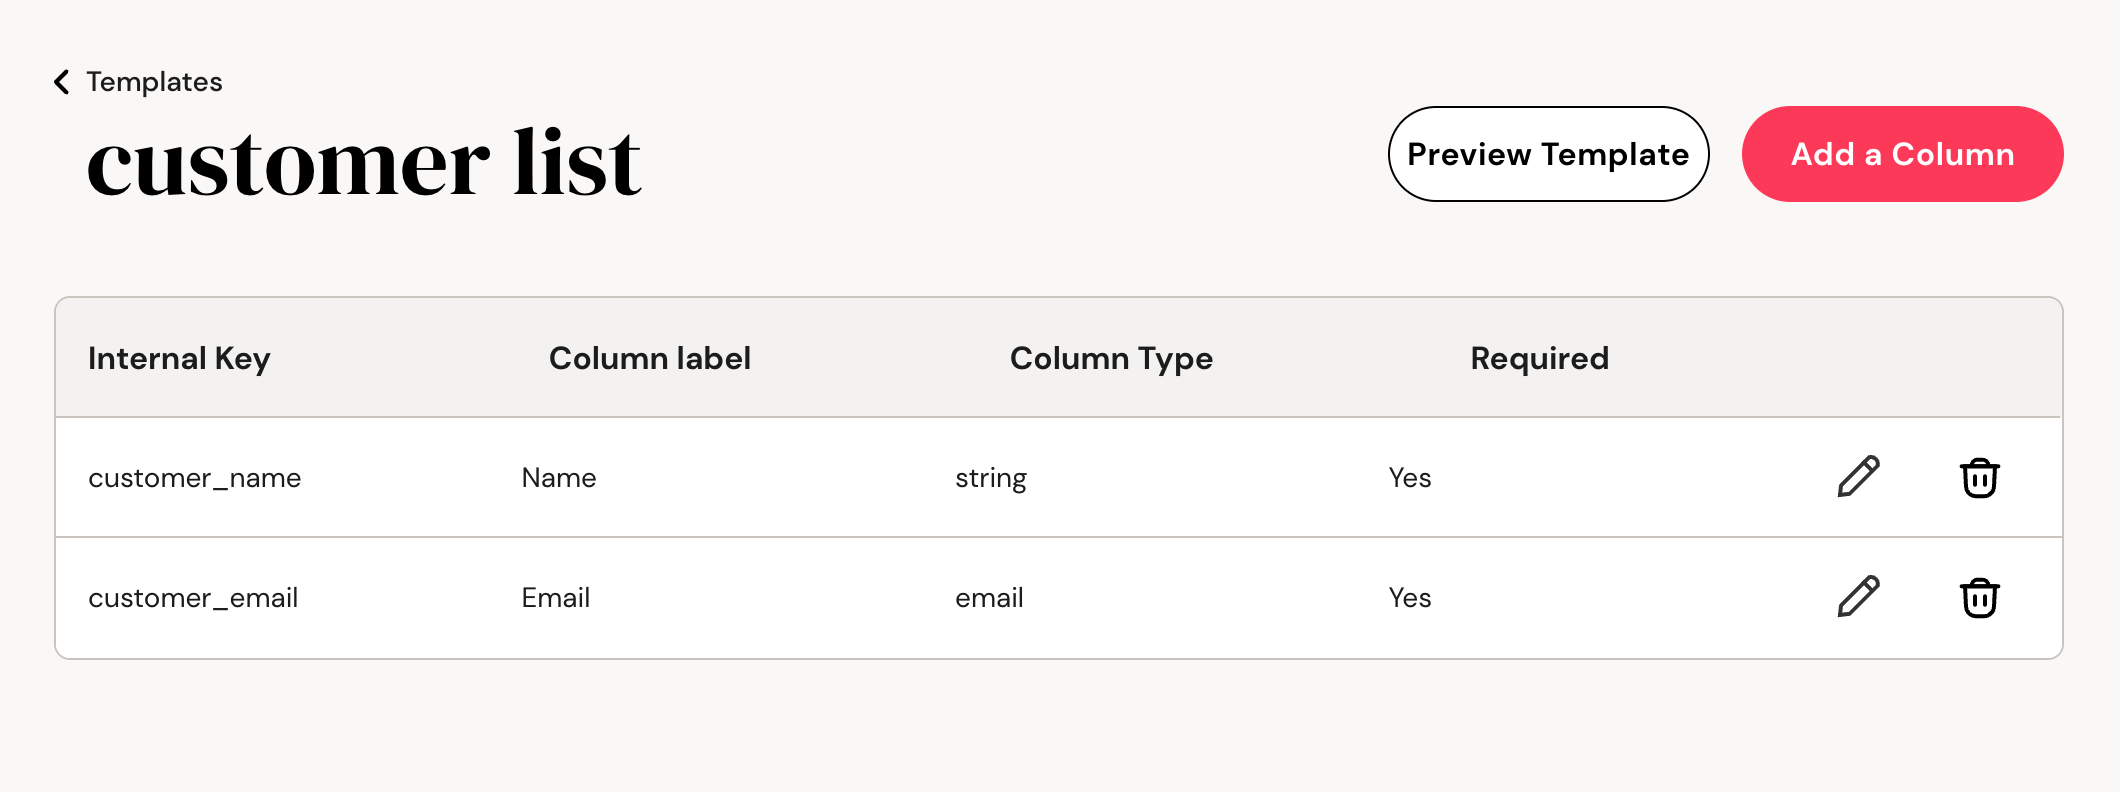
Now we’re ready to start coding. As you can see, it is very easy to create templates and columns on Flatirons Fuse.

Installing the React CSV Importer: fuse-importer

To get started with any react project, we simply need to utilize our favorite package management tool to add the fuse-importer requirement.

yarn add fuse-importer

yarn add fuse-importer

Creating our CSV Importer Component

We need to set up the flatirons fuse importer using our Template ID and Organization API Key. You can get them on the Templates page.

import React from "react";
import FuseImporter from "fuse-importer";

const CSVImporterComponent = () => {
 function showImporter() {
   const organizationApiKey = "YOUR ORGANIZATIONS API KEY";
   const templateId = "YOUR TEMPLATE ID";
   const importer = new FuseImporter(organizationApiKey, templateId);

   importer.onValidateRecord = async (record) => {
     // return no frontend validation errors
     return {};
   };

   importer.onSubmit = async (records) => {
     // an empty hash will tell us the import was successful!
     return {
       message: "Your data was imported successfully",
       errors: {},
     };
   };

   importer.show();
 }

 return <button onClick={showImporter}>Show Importer</button>;
};

export default CSVImporterComponent;

Setup the Required Hooks

Our importer instance needs two required hooks to get to work; onSubmit and onValidateRecord. Don’t worry about them now. We’ll explain the hooks later. For now, we just need to call the method “show” in our importer instance to use it.

Now we are ready to use our CSVImporterComponent at any place in our app. I’ll include this in my App component.

import logo from "./logo.svg";
import "./App.css";
import CSVImporterComponent from "./CSVImporterComponent";

const App = () => {
 return (
   <div className="App">
     <header className="App-header">
       <img src={logo} className="App-logo" alt="logo" />
       <CSVImporterComponent />
     </header>
   </div>
 );
}

export default App;

React as csv importer

Now when we click on the “Show Importer” button, we can see the Flatirons Fuse Importer working.

Flatirons fuse ready to import data

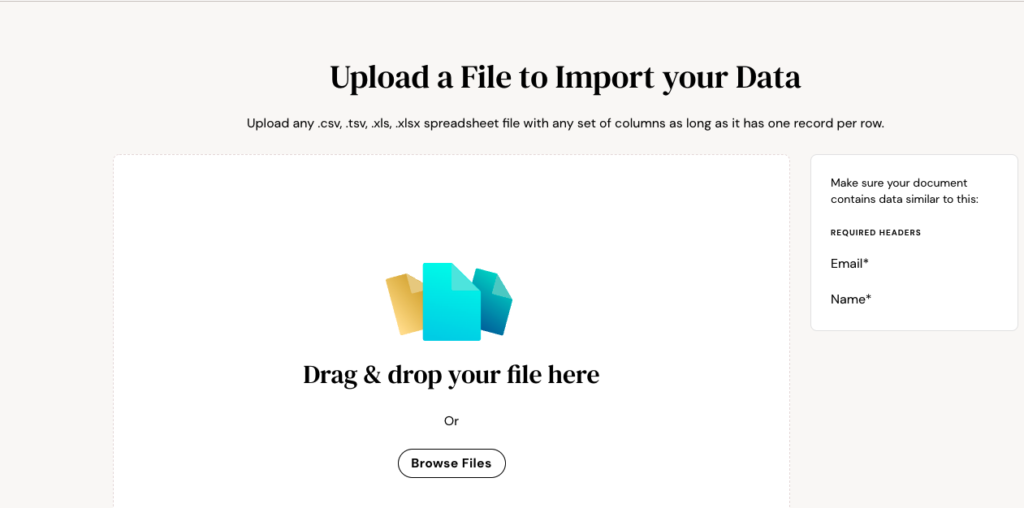
As you can see on the right hand side, the list of required fields is listed for the user. Now, we can test our importer using a CSV file:

first_name,email
grady,gcrathorne0@flatironsfuse.com
kevyn,ksprowell1@wordpress.com
barr,bterese2@flatironsfuse.com
lonna,lcaslake3@flatironsfuse.com
shannon,sbrackenridge4@flatironsfuse.com
emilie,etregensoe5@flatironsfuse.com
toiboid,tmersey6@flatironsfuse.com
jourdain,jgiraudou7@flatironsfuse.com
garvy,gspendlove8@flatironsfuse.com
gregoire,gspensly9@flatironsfuse.com


Flatirons fuse columns verification step

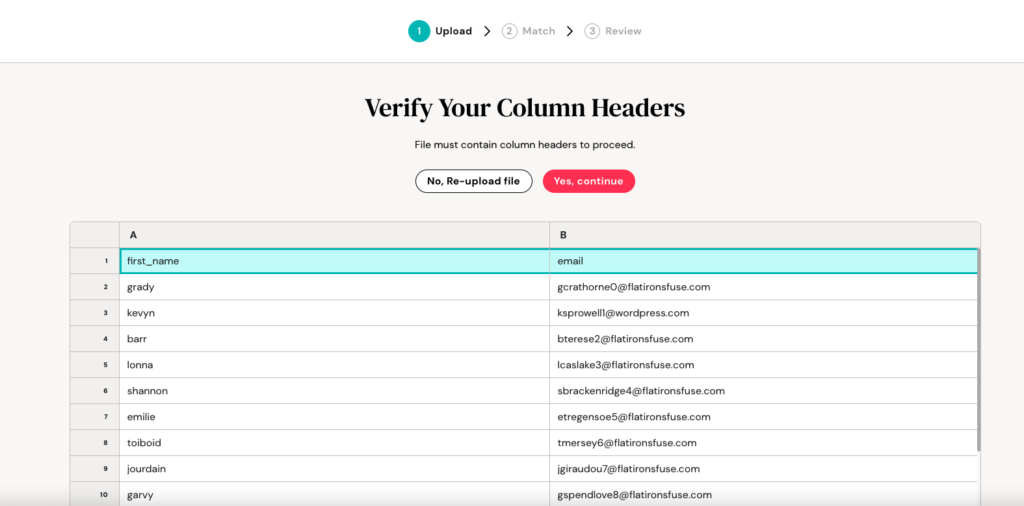
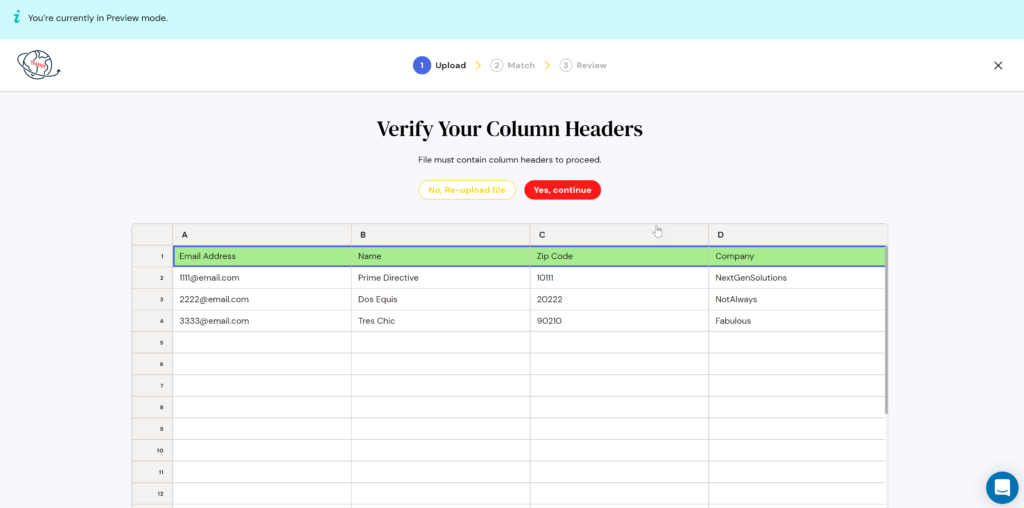
Check if everything is OK, and click on “Yes, continue”.

Flatirons Fuse check matching columns step

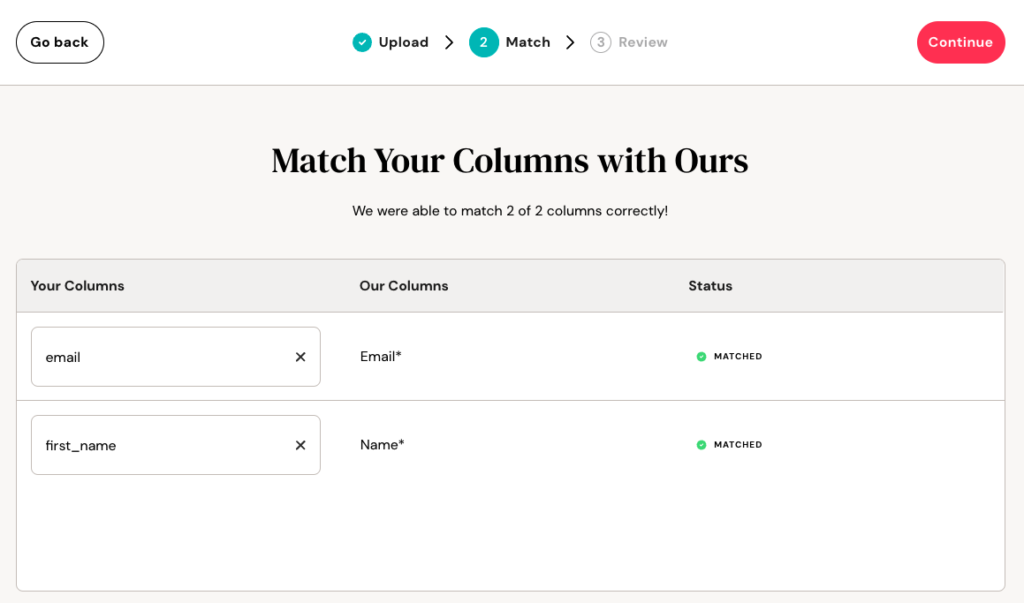
Here we can see Flatirons Fuse match our columns with template columns. Just click on “Continue”.

Flatirons Fuse review correct data step before submitting

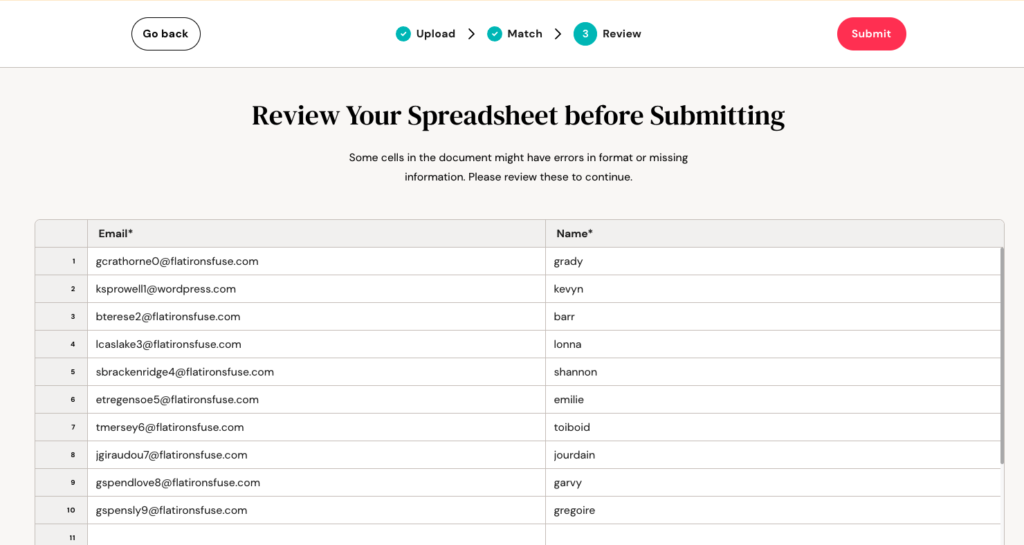
In the last step, we can review our data before submitting it. Let’s make things more complex and implement some custom validations before submitting.

Performing Data Transformations when Loading CSV Data

When the CSV importer is initialized, you have the chance to transform data. For example, let’s say that your system wants all customer name’s to be capitalized. Instead of adding validation and requiring the user to go through each row and capitalize the first letter, you can use the formatRecord hook to do this on your user’s behalf. Here’s an example:

importer.formatRecord = (record) => {
 const newRecord = { ...record };

 // capitalize first letter in customer_name
 if (typeof newRecord.customer_name === "string") {
   newRecord.customer_name =
     newRecord.customer_name.charAt(0).toUpperCase() +
     newRecord.customer_name.slice(1);
 }

 return newRecord;
};

Adding Custom Front-end Validations Before Submitting

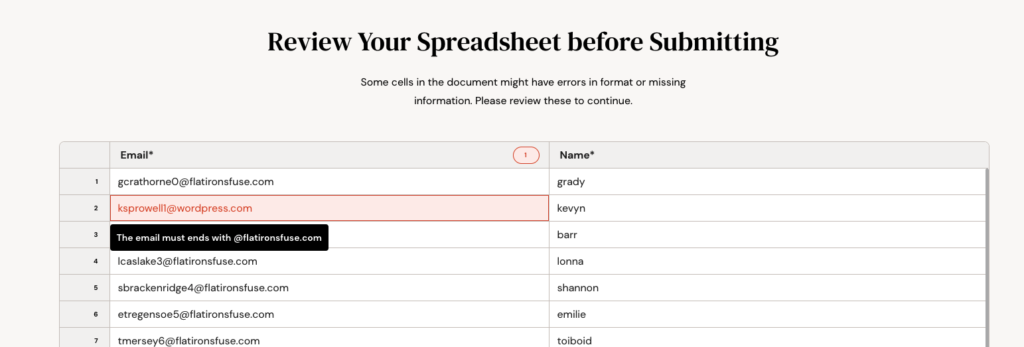
If data transformations aren’t enough, you can add custom (front-end) validations to your react CSV importer that users must follow before submitting data. For the sake of this example, we will introduce a rule that ensures that all uploaded emails must end with “@flatironsfuse.com”. Let’s see how easy it is. To do this, we have to implement a custom logic inside the onValidateRecord hook.

importer.onValidateRecord = async (record) => {
 const errors = {};
 const customerEmail = record["customer_email"];
 if (customerEmail && !customerEmail.endsWith("@flatironsfuse.com")) {
   errors["customer_email"] = "The email must ends with @flatironsfuse.com";
 }
 return errors;
};
importer.onValidateRecord = async (record) => {
 const errors = {};
 const customerEmail = record["customer_email"];
 if (customerEmail && !customerEmail.endsWith("@flatironsfuse.com")) {
   errors["customer_email"] = "The email must ends with @flatironsfuse.com";
 }
 return errors;
};

If we re-upload our CSV file, an invalid row will appear as follows:

Flatirons Fuse app showing error detected before submiting


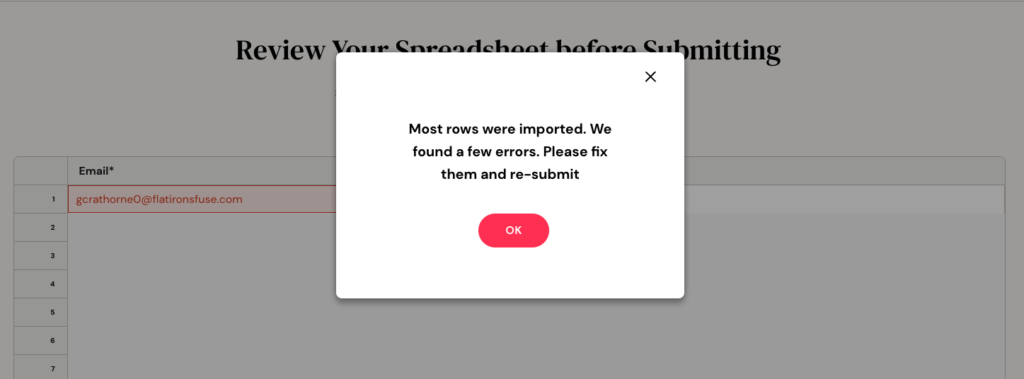
Adding Custom Backend Validations on Submit

Flatirons Fuse allows back-end validation data in a simple way. To do this, we should use the onSubmit hook. Every single record passed to the onSubmit function has a 

records[0]._meta.id
records[0]._meta.id

If you have an issue with a record on the backend, you can respond to the request with this id and an error message and we will show the user how to correct the issue. For example, let’s say that we need to ensure that all of our emails must be unique in our database. Again, for the sake of providing an example, imagine that someone imports a CSV that contains an email that already exists in your database.

We’ll use a fake backend call for testing purposes.

async function fakeBackendValidation(records) {
 // in this function you would actually submit records to your backend
 return new Promise((resolve) => {
   setTimeout(() => {
     resolve({
       message:
         "Most rows were imported. We found a few errors. Please fix them and re-submit",
       errors: {
         [records[0]._meta.id]: {
           customer_email: "Email is already taken. Emails must be unique.",
         },
       },
     });
   }, 1000);
 });
}


importer.onSubmit = async (records) => {
   return await fakeBackendValidation(records);
};
importer.onSubmit = async (records) => {
   return await fakeBackendValidation(records);
};

When we try to re-upload our data, we can get this validation.

Flatirons Fuse app error message on submitted elements

All done. Our final component should look like this:

import React from "react";
import FuseImporter from "fuse-importer";

async function fakeBackendValidation(records) {
  // in this function you would actually submit records to your backend
 return new Promise((resolve) => {
   setTimeout(() => {
     resolve({
       message: "Most rows were imported. We found a few errors. Please fix them and re-submit",
       errors: {
         [records[0]._meta.id]: {
           customer_email: "Email is already taken. Emails must be unique.",
         },
       },
     });
   }, 1000);
 });
}

const CSVImportComponent = () => {
 function showImporter() {
   const organizationApiKey = "YOUR ORGANIZATIONS API KEY";
   const templateId = "YOUR TEMPLATE ID";

   if (
     organizationApiKey.indexOf("YOUR") !== -1 ||
     templateId.indexOf("YOUR") !== -1
   ) {
     window.confirm(
       "You need to configure your organization api key and template id."
     );
     return;
   }


   const importer = new FuseImporter(organizationApiKey, templateId);

   importer.onValidateRecord = async (record) => {
     const errors = {};
     const customerEmail = record["customer_email"];
     if (customerEmail && !customerEmail.endsWith("@flatironsfuse.com")) {
       errors["customer_email"] =
         "The email must ends with @flatironsfuse.com";
     }
     return errors;
   };

   importer.formatRecord = (record) => {
     const newRecord = { ...record };

     // capitalize first letter in customer_name
     if (typeof newRecord.customer_name === "string") {
       newRecord.customer_name =
         newRecord.customer_name.charAt(0).toUpperCase() +
         newRecord.customer_name.slice(1);
     }

     return newRecord;
   }
  
   importer.onSubmit = async (records) => {
     return await fakeBackendValidation(records);
   };

   importer.show();
 }

 return <button onClick={showImporter}>Show Importer</button>;
};

export default CSVImportComponent;

With your importer and custom validations/transformations set up, the only thing left to do is to customize (brand) your importer.


Customize the CSV Importer

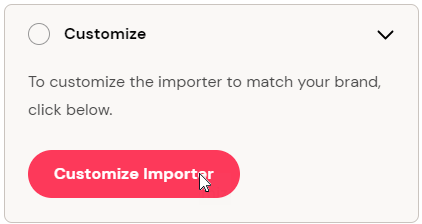
Your React.js CSV and Spreadsheet importer would not be complete without the option to customize it to match your site or application. Our Get Started guide allows you to customize your importer to match your branding for a seamless experience. Simply click the Customize Importer button or click Branding in the left-hand menu. 

Flatirons Fuse app message for customize importer

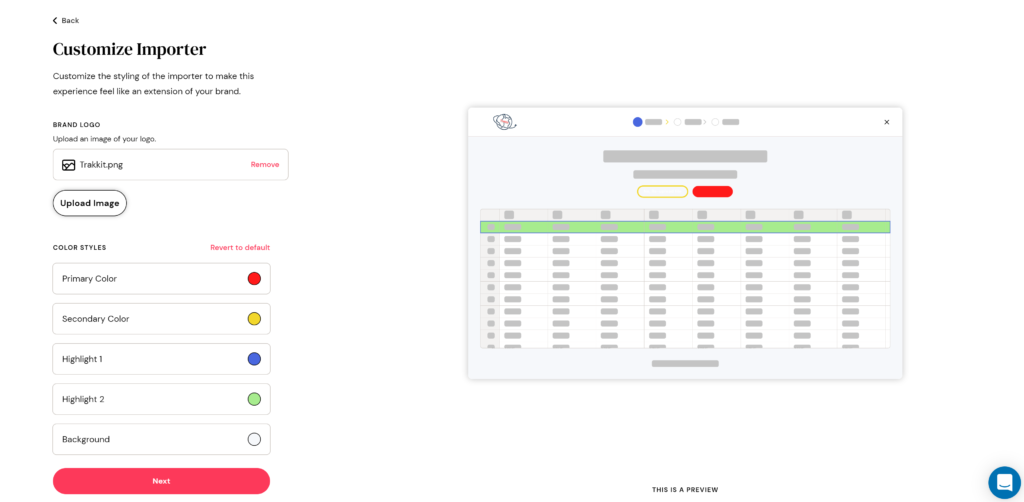
On the Branding page, you can customize colors, add a logo, and set a background, all to better match your solution, ensuring your Angular.js Spreadsheet and CSV importer are just that – yours.

Flatirons Fuse app customize importer step

You can get a sneak peek from your customer’s viewpoint by going back to the Templates screen and clicking the Preview link.

Flatirons Fuse templates board sneak peek

Here you can see the logo applied, and the colors selected.

Flatirons Fuse app on uploading files preview mode

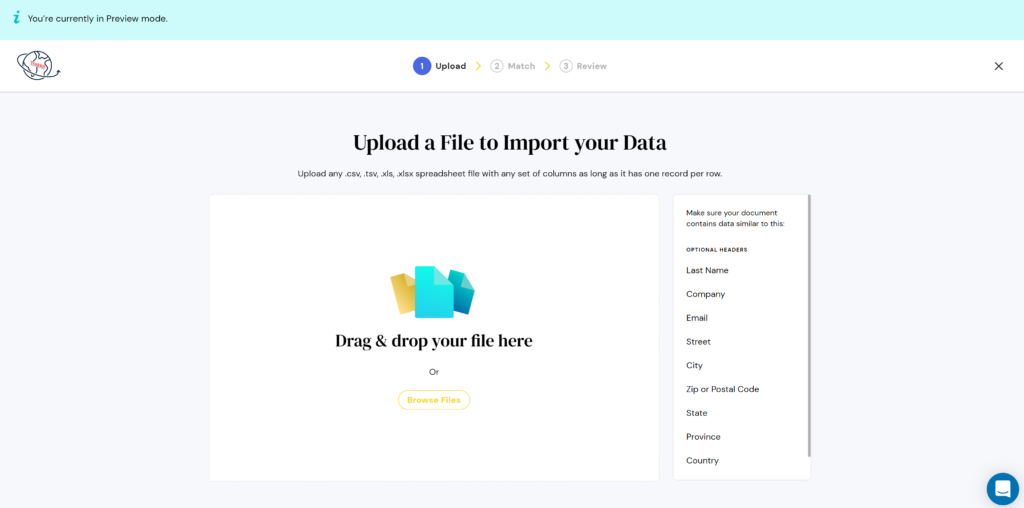
You can even preview the functionality by dragging and dropping a .CSV file, or by clicking browse files. 

Flatirons Fuse app column headers step on preview mode

Creating a seamless user experience is our main goal, and an intuitive flow and strong validation/transformation capacity is a key part of that. We hope our branding and customization features can deliver the final piece of the puzzle, ensuring that your newly configured CSV importer is just that – yours. 

author-avatar
More ideas.
Development

Software Development in Colombia: Ultimate Guide in 2024

Flatirons

May 03, 2024
Development

Vital Software Development Outsourcing Statistics for 2024

Flatirons

May 02, 2024
Development

Fintech Software Development Outsourcing

Flatirons

May 01, 2024
Development

The Best Languages for Web Development: Guide in 2024

Flatirons

Apr 30, 2024
Development

Software Development in South America: A Guide

Flatirons

Apr 29, 2024
Development

Latin America Software Outsourcing: A Guide in 2024

Flatirons

Apr 28, 2024
Development

Software Development in Colombia: Ultimate Guide in 2024

Flatirons

May 03, 2024
Development

Vital Software Development Outsourcing Statistics for 2024

Flatirons

May 02, 2024
Development

Fintech Software Development Outsourcing

Flatirons

May 01, 2024
Development

The Best Languages for Web Development: Guide in 2024

Flatirons

Apr 30, 2024
Development

Software Development in South America: A Guide

Flatirons

Apr 29, 2024
Development

Latin America Software Outsourcing: A Guide in 2024

Flatirons

Apr 28, 2024